
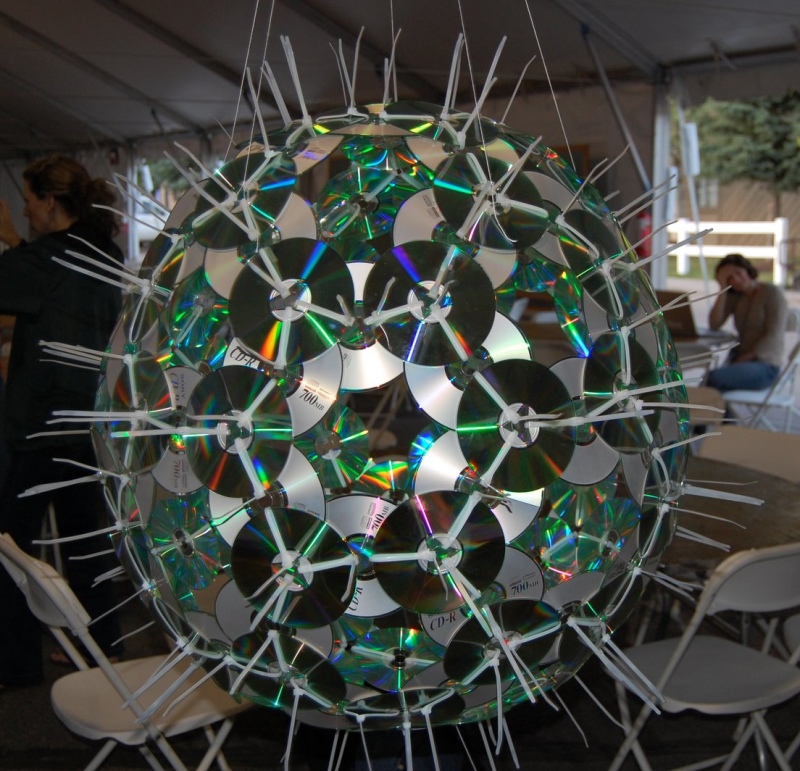
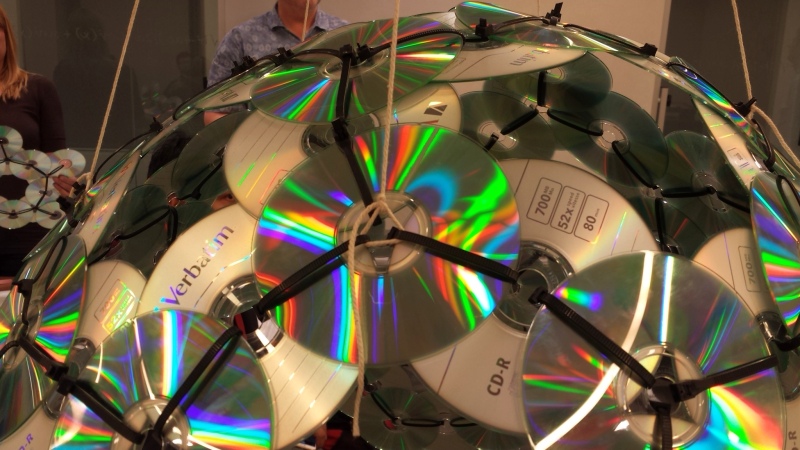
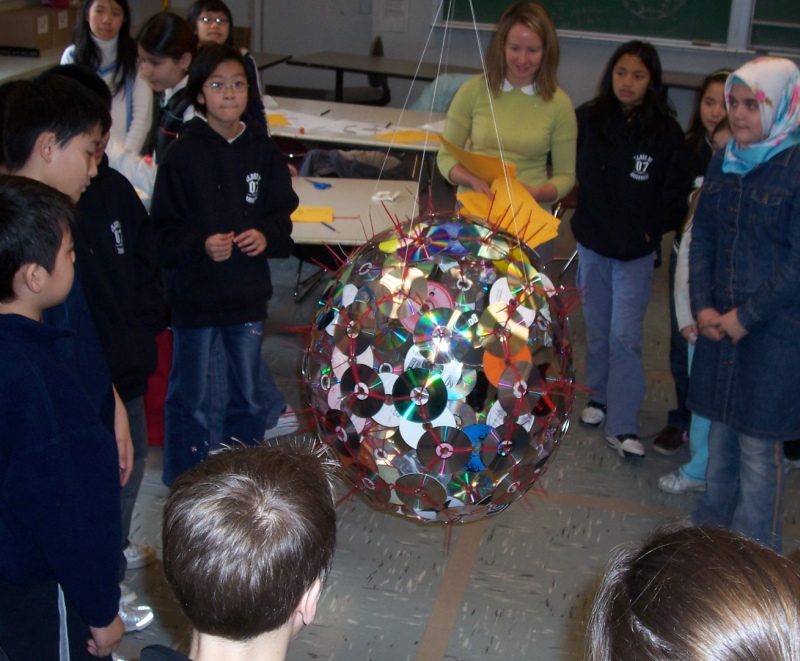
Disc-O-Ball
Disc-O-Ball
Truncated Icosahedron CD
Sculpture
The "truncated icosahedron" is a well-known shape that
students will be familiar with because it is the formal name for
the shape of a soccer ball. In this workshop, students
discover the deeper mathematical ideas behind the truncated
icosahedron by drawing and building the 3D shape
themselves. Students learn about "truncation" by starting
with the simpler, familiar example of cutting off the corners of
a cube to make a "truncated cube". Then they move on to
the icosahedron and the truncated icosahedron. They are
surprised when their drawing turns out to be a drawing of a
soccer ball.
This type of activity develops logical and spatial
reasoning and helps create a fluency with geometric ideas and
vocabulary that is beneficial throughout students' entire
mathematical careers. Translating the soccer ball's
underlying structure into a new material helps students
appreciate and become comfortable with abstraction in
mathematics. It demonstrates that mathematics can be found
within many familiar objects in their everyday lives.
Students enjoy collaborating on this shiny, large-scale construction that they can display in their classroom to show their school how much fun math can be. This workshop can be used as a starting point for a series of lessons on polyhedra or as a culminating activity. It could be extended by drawing and building additional polyhedra.
This activity provides rich classroom material for
teachers following the Common Core
Standards for Mathematical Practice. This lesson
also provides cross-curricular connections to art and
architecture.
Optional Materials
Notes:
The sculpture consists of only 150 CDs, however a few might break, so have at least 160. These can be new blank CDs, or recycled (used) with mixed labels, or surplus from a printed run (all the same label). (Surplus CDs can sometimes be obtained from manufacturers, for art use, if they develop a new product version and discard their stock of the previous version.) Be cautious about using DVDs because some are constructed differently and are not as strong but others are fine.
The sculpture is held together with 180 cable
ties, however when an assembly error is made or a CD is
broken, some ties must be cut off to make the repair, so
have 300 ties available.
Choose an appropriate place ahead of time to hang
the structure from, because you will work on it while it is
hanging. It is light enough to clip on to a suspended
ceiling.
This activity can be divided over several sessions. The preparatory drawing is optional though highly recommended for deeper understanding.
Safety Note:
During the construction phase, always have a pair of wire cutters on hand in case a student places a cable tie around a body part.
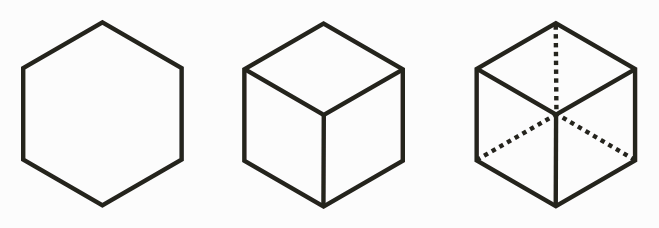
3. After discussing several ways of representing a cube,
direct students to follow the the "isometric" method by having
them copy on their sheet what you draw on the board. (These
drawings do not need to be very precise; a clear sketch is
sufficient.) As shown below, draw a regular hexagon.
(Note: there are two vertical sides, no horizontal sides.)
Connect the bottom vertex and two others to a point at the
center. With dotted or lighter lines, connect the remaining
three vertices to a point that is also at the center.
4. Now use the drawing (and physical model) to have the
students count and answer questions about the number of
components in a cube. They should respond that a cube has
6 faces, 8 vertices, and 12 edges. At
each vertex, 3 squares meet.
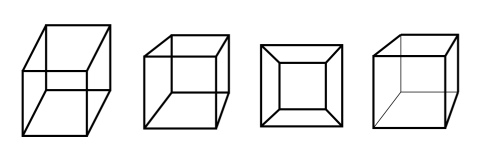
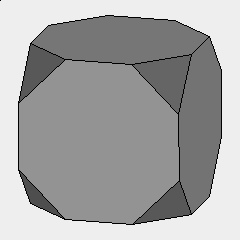
5. A "truncated cube" is a cube with the corners cut
off. Ideally a physical model can be shown, otherwise
indicate with a cube the action of sawing off the corners.
The next step is to have students draw a truncated cube,
as a way for them to more deeply understand the process of
truncation. Illustrate the following steps on the board
and have the class follow on their own papers. Start by drawing
the "isometric" cube as above, but lightly, and large enough to
fill the paper. Mark two points on each of the cube’s edges
[left figure below]. The points should divide the edges into
three approximately equal pieces. Darken the middle third of
each cube edge [middle figure below]. Around each cube vertex,
connect three points to make a triangle with dark lines [right
figure below].
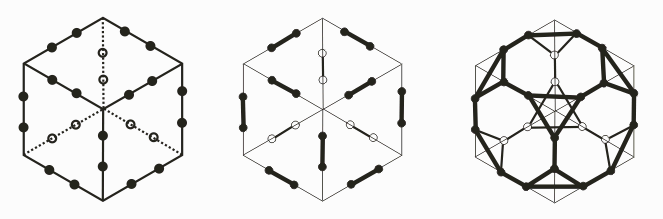
You can erase the truncated parts and darken the triangles to help make the structure clear. In this diagram, the lines in the back are drawn lighter than the ones in the front.
6. With students, count and discuss the number of
components. The truncated cube has 14 faces,
(namely: 6 octagons and 8 triangles). It
has 24 vertices and 36 edges. (Don’t count
one-by-one; use addition and/or multiplication.) At each vertex,
1 triangle and 2 octagons meet. The 6
octagons correspond to the original 6 faces of the
cube. The 8 triangles correspond to the
original 8 vertices of the cube.
7. Now it is time to draw an icosahedron. If you
have time and a good physical model, you can first challenge
students to find their own ways of drawing the
icosahedron. Demonstrate this method on the board and have
students follow on their own papers:

Draw a regular pentagon—large . (Try to make it regular,
with equal sides and angles. It shouldn’t look like a house.)
Connect each vertex to the center. Add a dot just outside of
each edge. Connect each dot to two nearby vertices of the
pentagon. With dotted lines, connect the five dots in a cycle to
make a dotted pentagon. With dotted lines, connect the five dots
to the center. Again you can point out that superimposed
at the center are two points that are actually as far as
possible away from each other in the 3D icosahedron.
8. Solicit the facts that the icosahedron has 20 faces, 12 vertices, and 30 edges. (Count these using groups of five.) At each vertex, 5 triangles meet.
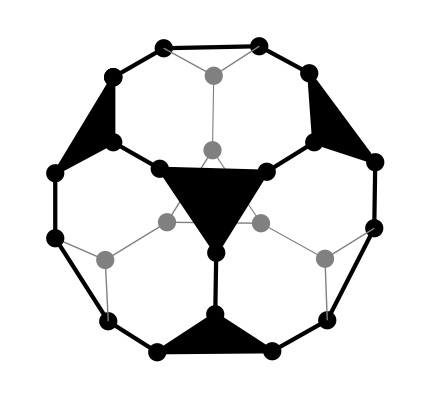
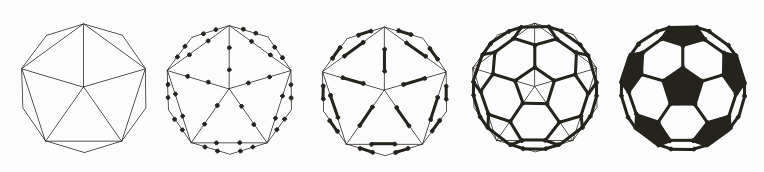
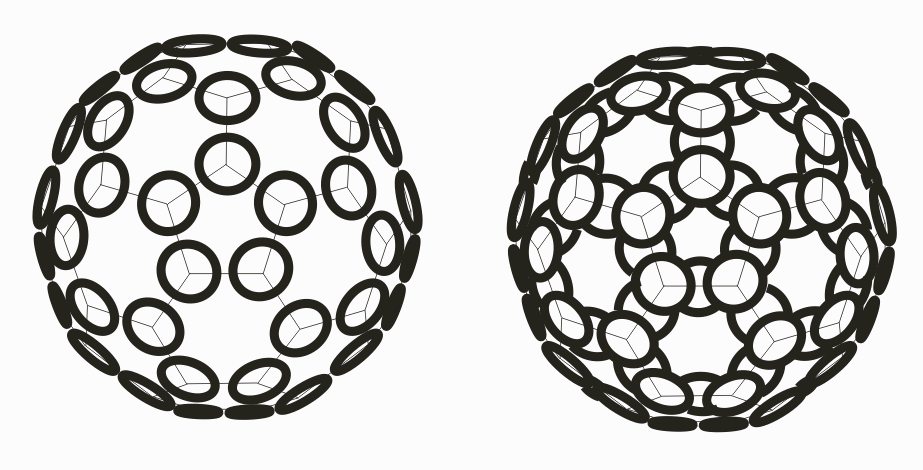
9. Tell students to put together the process of
truncation and their understanding of the icosahedron. With
older students, you can challenge them to draw a truncated
icosahedron without detailed instructions and some will discover
that a truncated icosahedron is the shape of a soccer ball
before you demonstrate the following. With younger students,
simply demonstrate this method on the board as they follow:
Draw another icosahedron, as above but very large and
leave out the dotted lines. (We are leaving out the back to keep
things simple.) Mark two points on each edge of your
icosahedron, dividing each edge into thirds. Darken the middle
third of each edge. Around each icosahedron vertex, connect the
five dots with dark lines, to make a pentagon. If you want it to
look more like a soccer ball, color the six visible pentagons
black.
10. Solicit the facts that the truncated icosahedron has 32 faces (namely: 12 pentagons and 20 hexagons). It has 60 vertices and 90 edges. At each vertex, 1 pentagon and 2 hexagons meet. Tell students that they’ll need to carefully keep track of pentagons and hexagons in what follows and to remember that each vertex has the same combination: one pentagon and two hexagons.
With middle and elementary school students, stop the drawing at this point and start the assembly (Part B). With high school students, continue with the next drawing step
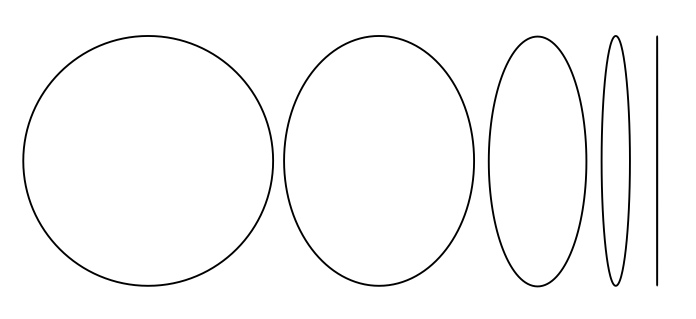
11. Explain the concept of foreshortening.
(Distances on paper do not correspond to distances in 3D,
depending on the angle of the object.) In particular, a 3D
circle, e.g., a CD, will appear in a drawing as an
ellipse. Hold up one CD as an example and point out that
as you tilt it from face-on to edge-on, the view changes from
a circle to a line segment with a range of ellipses in
between:
13. This is a good time to ask students how many CDs are
required for the entire construction. (If this activity is
divided into two sessions, this makes a good homework question
for students to think about.) Including edge disks and
vertex disks, we’ll need a total of 150 CDs.
Wherever an edge disk overlaps a neighboring vertex disk, they will be tied together with a plastic cable tie that goes through the center hole of each. We’ll need 180 cable ties.
Part B. Assembly Process
Preparatory notes:
Care is required. CDs are made of acrylic plastic, which is strong (the windows in storm doors are made of acrylic) but brittle. If bent too much, they crack and snap. One must be careful during the construction not to over-bend the CDs. If the sphere is rested on a table, the lower CDs will be bent from the weight above and will likely snap. So the sculpture must always be suspended as described below, so that its weight does not bend the CDs.
If a CD does snap, the sculpture can be repaired. The ties can be cut with wire cutters. The broken CD is easily removed and a replacement added. Similarly, when a mistake in assembly is made, you can cut the ties necessary to correct it.
1. Caution the class not to play with the cable ties:
“Do not tie them around your fingers, wrists, or anywhere other than the CDs.”
2.
Younger students are unfamiliar with cable ties and might need
more help. Even with older students, demonstrate how the tip
of a cable tie goes into just one side of the locking part of the
tie, not the other side.
3.
Explain the following convention: The vertex disks will be
on the outside of the sphere, with their shiny side facing
outwards. The edge disks will be on the inside, with their shiny
side facing inwards. This means that whenever two CDs touch, they
touch label-to-label. The shiny sides do not touch the shiny sides
of other CDs. You can show this by holding up two disks,
overlapping them label-to-label.
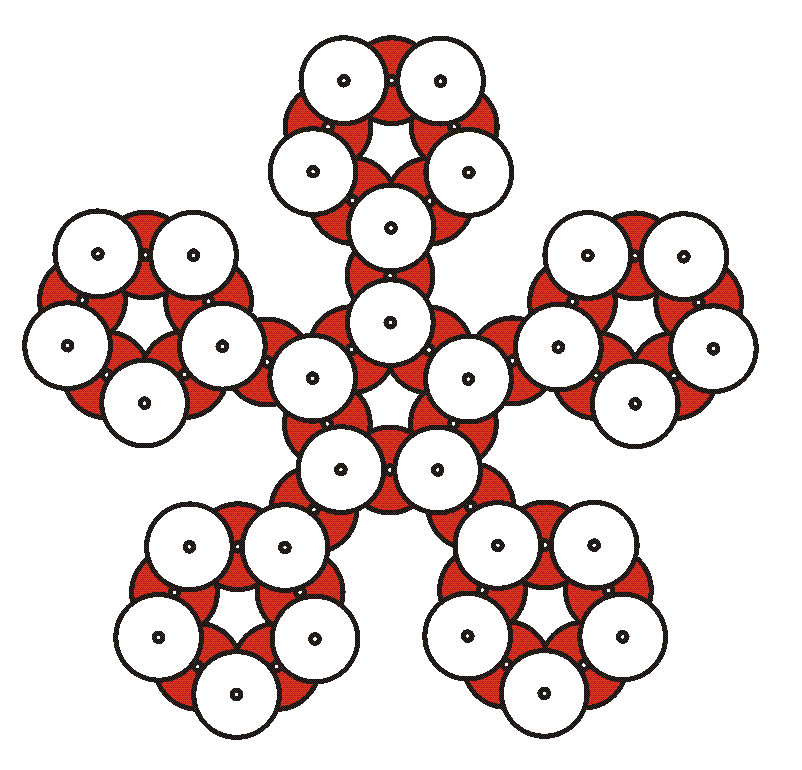
4. Divide the
class into six groups. The class as a whole will make twelve
pentagon modules. If the class is divided into six groups, each
group can make two modules. (For elementary students, this
can be posed as a fun division problem.)
5. Hand out ten
CDs to each group. Do not hand out cable ties yet.
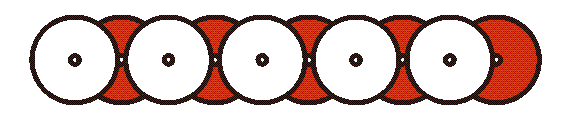
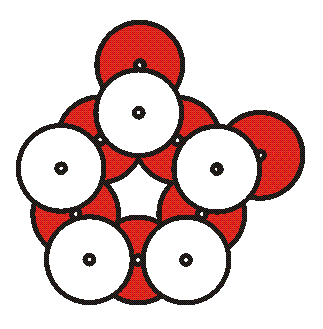
6. Ask students to
make a “chain” of ten CDs on a flat table, as above, making sure
no shiny sides touch. The shaded parts of the image represent the
printed labels of the CD. The five CDs on the bottom have their
shiny sides down. The five on top have their shiny sides up.
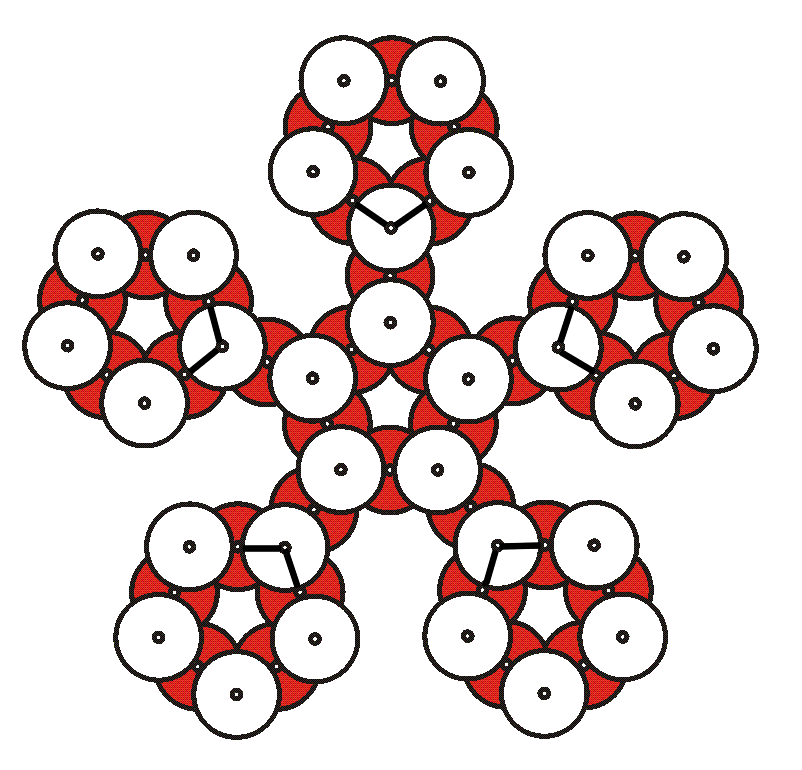
7. Walk around to each group to check they have the correct pattern. If so, hand them ten cable ties. Explain that from disk to disk, the connection is made with a cable tie through two CD holes. They will use nine cable ties to make a straight chain then the tenth to close it into a cycle. When they curve the chain into a cycle and close the loop with the last tie, it makes a regular pentagon as shown:
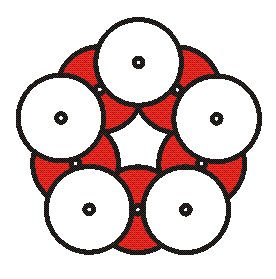
You can position each
tie so the free end sticks up out of the plane at either of the
two holes that the tie passes through. The free ends will
naturally point upwards. Pull all ties tight. You can point out
that the alternating CDs correspond to
vertex-edge-vertex-edge... in the center pentagon of their
drawing.
8. Choose one group's pentagon module to be at the “North Pole”. Place it on a flat table to be used for the construction. The other modules will be added to it.
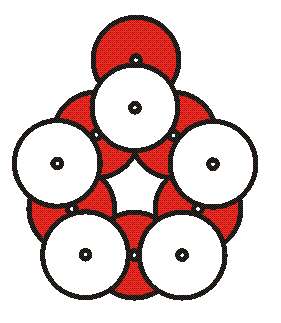
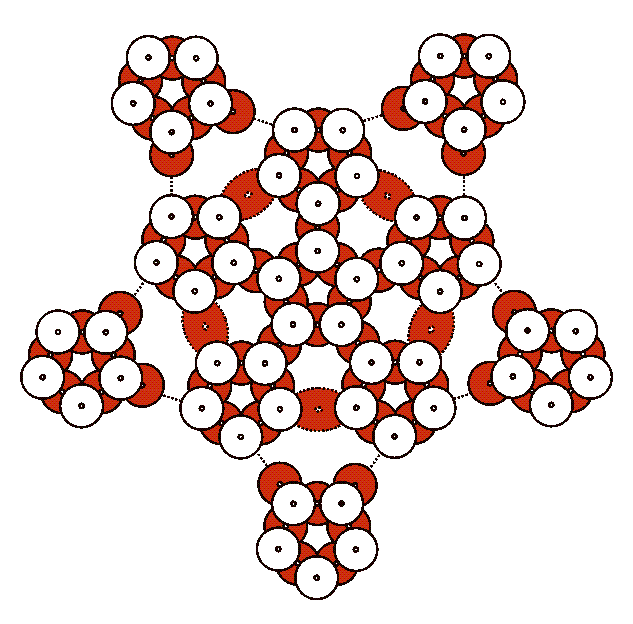
10. Five one-eared modules will connect to the center module to make the shape above. Connect each module by its ear to the bottom of an upper CD of the center pentagon. Remind students that the rule still applies that the CDs must touch label-to-label. This means there are only five correct places for the ears to connect to the center module. The angles are adjustable. For now, the angles need only be approximate; we will fine-tune them later.
11. While the students
are working, cut five pieces of string each three feet long. Tie
them together at one end so they form a bundle of five strings.
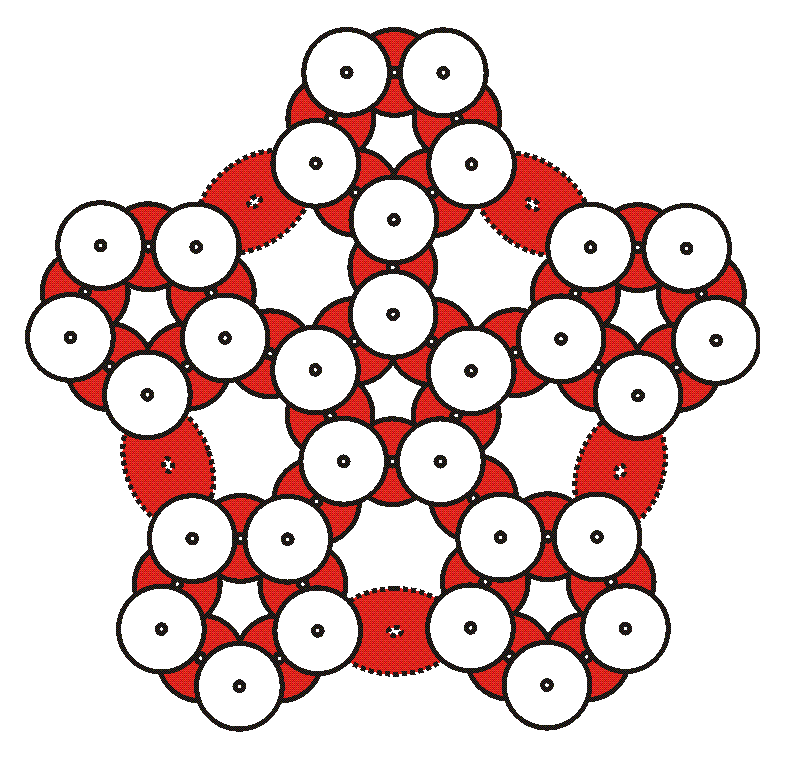
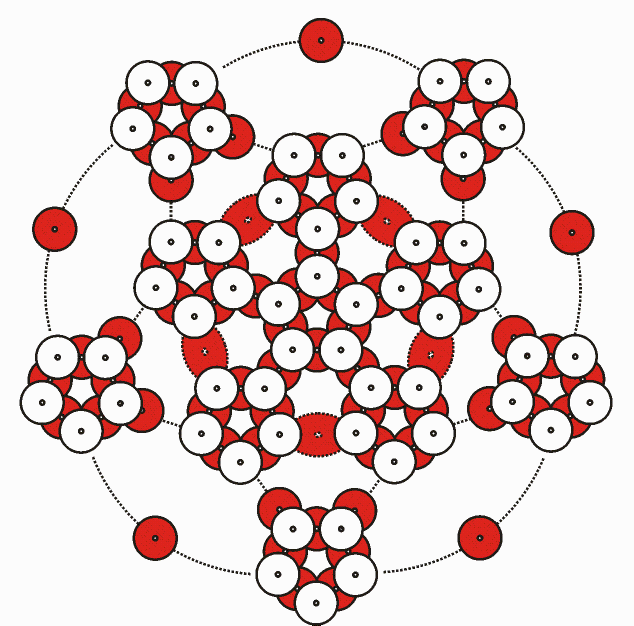
12. In this step, the
five loose ends of the string bundle will connect to five location
marked in the figure below. Each marked location in this image
represents two cable ties. (The remaining cable ties are
not shown.)
At each of these five
locations, tie one string through (under) both of the cable ties,
so the load is distributed twice as much. Someone can hold
the knotted end of the bundle in the air over the center of the
structure while the five loose ends are tied to these five support
locations. The knots should be made the same distance (say, two
inches) from the free end on each of the five strings, so the load
is balanced. Remember that each string goes through the two
cable ties that are part of a pentagon, to distribute the load as
much as possible.
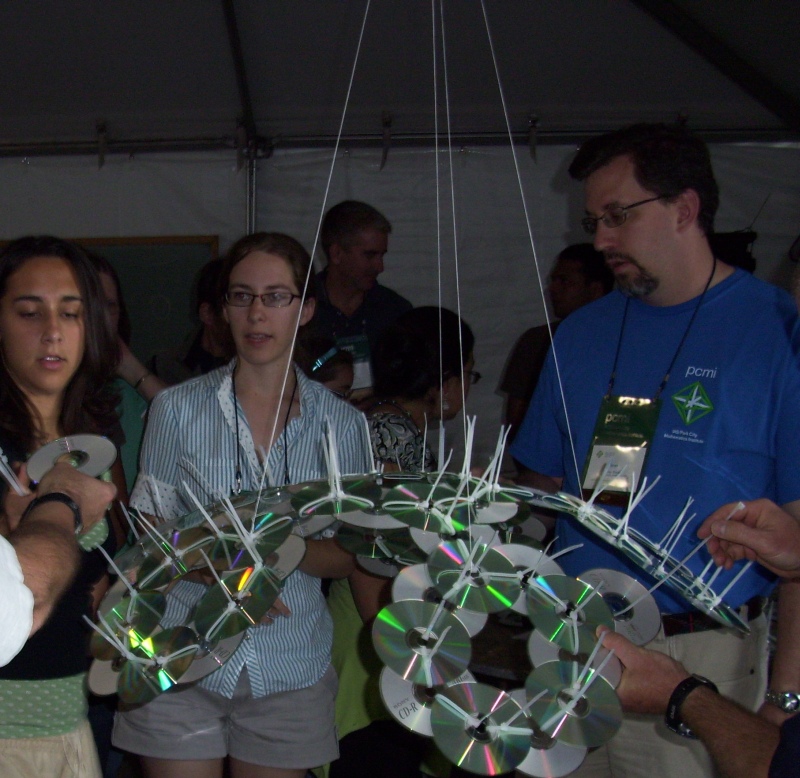
13. We now go from 2D
to 3D. Gently raise the sculpture by the top of the string
bundle and secure it to the ceiling. It will naturally curve to
form a partial sphere. Don’t be afraid to bend the CDs slightly.
15. Have some of the other students add two CDs shiny side down to the bottoms of five of the remaining modules. This makes two-eared pentagons, as shown above. The two ears go underneath two adjacent face-up CDs.
16. One at a time, connect the five two-eared modules as illustrated by the dotted lines above. These will form the bottom of the sphere. Again, as you connect the modules, bend the CDs gently. You are creating more hexagonal openings.
Coloring Variations. Using different colors of cable ties will give color to the edges, for example, emphasizing the pentagons with a different color from the connecting edges.
Long-edge Egg Variation. Make pentagon modules as above, but connect them to each other with “ears” that are not just one CD but are three CDs long. Gravity will stretch the final sculpture into an egg shape. But if you spin it, it widens.
Tall Variation. An icosahedron can be seen as a pentagonal antiprism capped by two pentagonal pyramids. An elongated structure can be made as a stack of two or three pentagonal antiprisms, capped by two pyramids. Truncate such a structure to make a prolate form composed of pentagons and hexagons. You can make a Hamiltonian cycle on this form also.
Hamiltonian Cycle Variation. With 60 strips of masking tape (or strips cut from “post-its”) mark the edges of a Hamiltonian cycle on your truncated icosahedron. One at a time, replace the remaining ties with a different color. Exercises on paper with nets of polyhedra may be done first, to explain the concept of a Hamiltonian cycle.