Making Math
          Visible

Design Your Own Sculpture

Geometric Sculpture V


Oftentimes, students don't realize that mathematics can be used in creative ways.  In this workshop, they get to experience first-hand the process of designing an original mathematical artwork.  Based on an understanding of geometric principles, they will propose a design which satisfies mathematical constraints while also being aesthetically pleasing.  We have found that when students are given the opportunity to take ownership of their work, they become more confident and more fully invested in the learning process.

Time Required:  0.5 hour for design.  0.5 hour for assembly

Materials:
Notes:
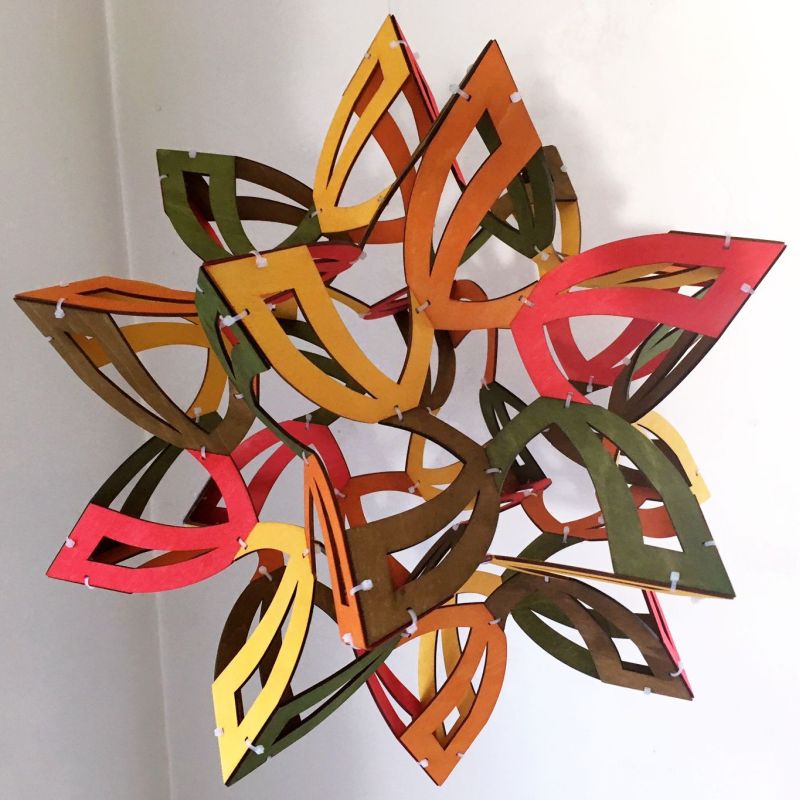
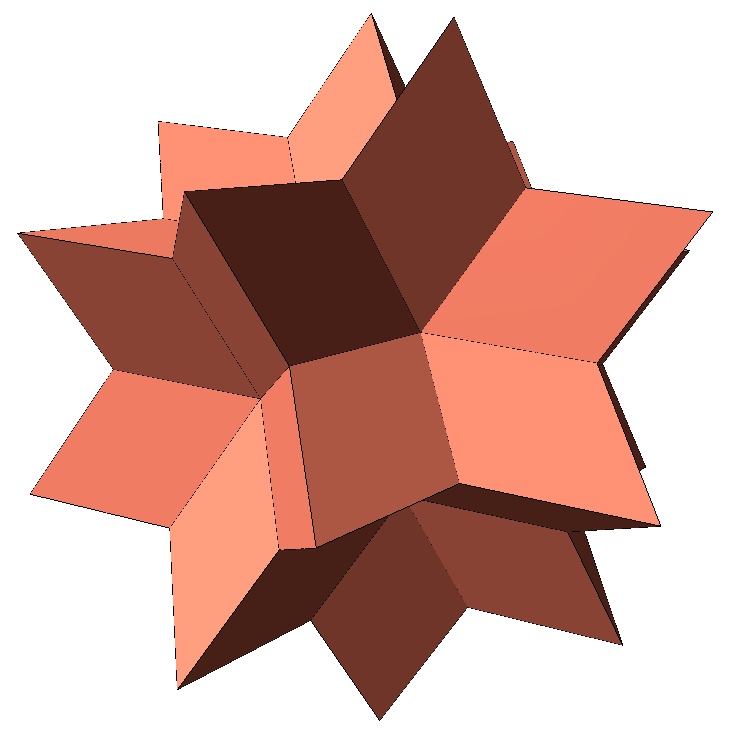
1. We assume students have already built the Autumn sculpture, so are familiar with its structure and how its parts connect.
2. Allow time to make photocopies in the middle of this workshop. 
3. The design and assembly can be naturally split over two days, giving students more design time.
Part A: Design


1. Looking at the Autumn sculpture, invite students to recall how the sixty parts join at their straight segments.  Each part has two long edges of the same length and two short edges of the same length.  The long edges join other long edges to make cycles of three parts.  The short edges meet other short edges to make cycles of five.


2. Point out how the part's shape fits inside of a rhombus, sharing parts of the rhombus' edges.  Those edges are important because they are where the sculpture holds together.  Each piece of the sculpture is planar---it lies within a plane.  The intersection of two planes is a line, so where two parts meet must be a straight line segment, not a curve.


3. Show students what the sculpture would look like if the pieces were a complete rhombus.  This shape is called a rhombic hexecontahedron.  It can be assembled from 60 rhombi if their acute angle is 63.5 degrees.  Explain to students that the structure of the sculpture was designed by carving away parts of the rhombus.


4. Have a discussion with students about how much can be removed from the rhombus before the sculpture falls apart.  Students should conclude that at least one segment from each of the four edges is needed to hold the structure together, but it doesn't have to be the particular long and short segments chosen in the design of Autumn.  Furthermore, segments on the left need to match with segments on the right.  The image above emphasizes the matching edges for the example of the Autumn piece shape.  The upper half of the rhombus edge is retained in the long edges; the middle third of the rhombus edge is retained in the short edges.

5. Hand out the paper template sheets.  Project or draw the image above of Autumn's matching segments on the board.  Ask students to first draw the mating edges on one of the rhombus templates, making them thick and dark for clarity.  The template has ten grid lines per edge to measure the segment's positions, allowing students to darken the upper half of the two upper edges and the middle third of the two lower edges.

6. Ask students to sketch the Autumn part shape using their segments as a guide and consider how it could be varied while still connecting with the same matching segments.  Have a discussion in which they conclude that the curves could vary in many different ways, as long as they connect the segments.  The segments are a mathematical constraint but the curves allow artistic freedom.  The hole in the Autumn part shape is just one example of the freedom of design; it doesn't affect the connections.

7. Now students can start thinking of their own shape to build a sculpture from.  Instruct them to first draw (darken in) their choice of segments where the pieces join.  Give students the following constraints when choosing their segments:

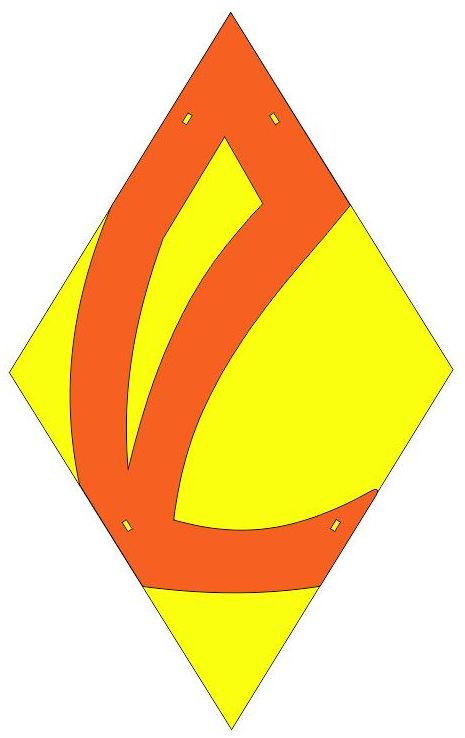
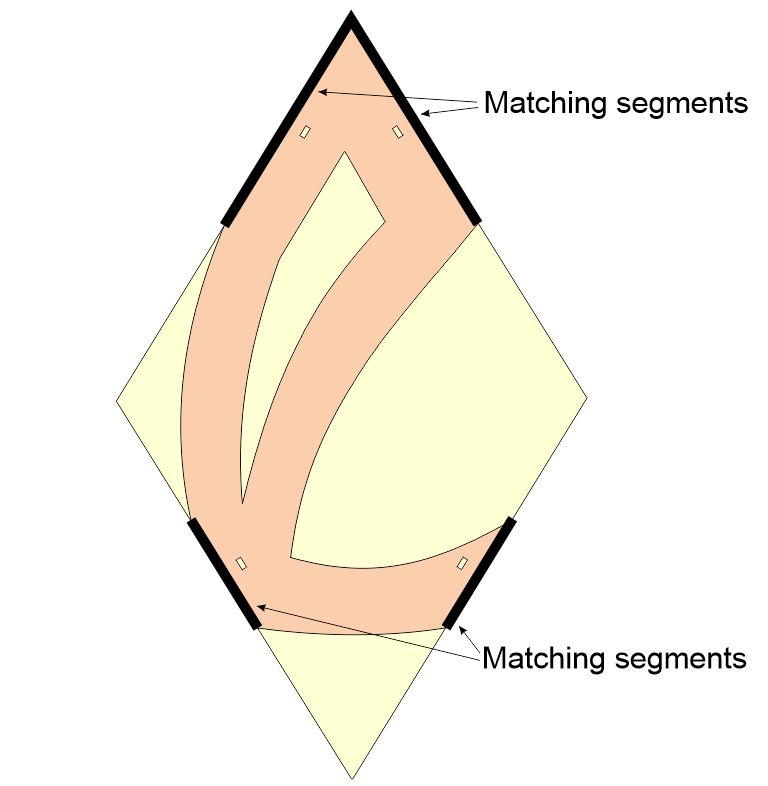
8. Students can then draw their own curves that connect the segments.  Suggest that they shade in the part to make clear which regions, if any, are holes.  Guide them to visualize what their finished sculpture would look like if assembled from sixty copies of the piece they designed.  Point out that there is also an engineering issue: the shape can not be too thin or the part will flex and sculpture will not be rigid.


Part B: Construction

1.  Ask students to display their designs and then choose one design which the class will make into a paper sculpture. 

2.  Using a photocopier, make sixty copies of the chosen template onto card stock.  
 
3. Hand out the printed card stock, scissors, and tape.  Ask students to cut out several copies each, so there are sixty pieces altogether for the class.

4. Direct students to tape the pieces together in the same manner as Autumn, first making three-part modules using the segments in the top half of the rhombus, then joining the modules in cycles of five using the segments in the bottom half of the rhombus.  The result will be a unique original design.


5. Here is a student design in which the parts are shaped like a curvy letter H.  The top of this page shows a student design in which the parts are shaped like the letter "Y".  Note that this has mirror symmetry while Autumn does not. 


Possible Extensions

A.  Each student can make their own complete paper sculpture.

B.  If you have access to a laser cutter, you can fabricate your designs in wood.  Using a drawing program, begin with a rhombus that has a 63.5 degree angle, mark the matching segments, then add your curves. You also have to add a hole large enough for a cable tie near the midpoint of each segment.  Bevel the edges with the same angles as Autumn.


C.  Because the rhombus is symmetrical, the piece can be flipped around to make a different sculpture with the same part shape.  For example, in Autumn, the short edges could be joined in groups of three and then the long edges could be joined in cycles of five, as shown above.  This gives a second sculpture with the same part shape.  Explore this idea to make a pair of sculptures of your own design.  If making them from wood, note how the beveling angles are different.