
Rhombic Triacontahedron Puzzle
I. Paper
Time Required: 80 Minutes
Materials
Part A. Minds-On
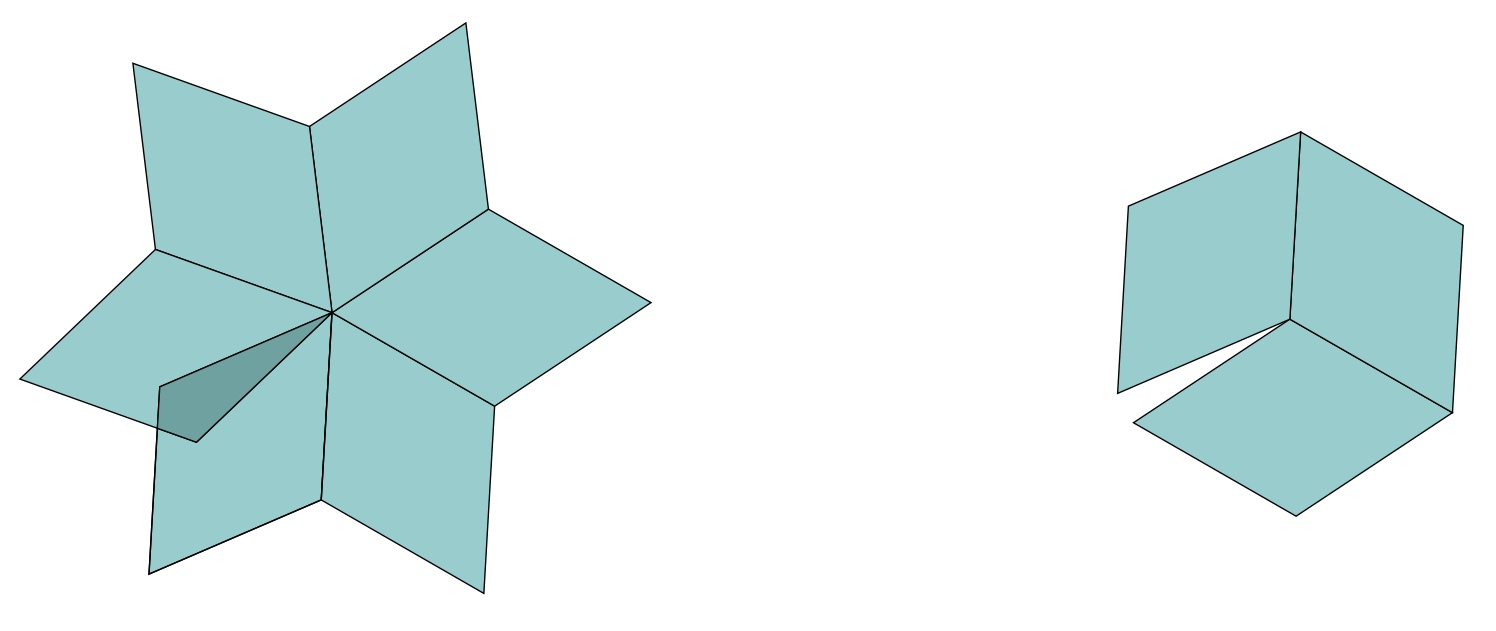
In order to get students thinking about geometric translation, we will introduce a drawing activity that uses parallel lines and translation to create images with parallelograms. Ask students to use paper and pencil to replicate what you draw on the board. The focus should be on parallel lines. This exercise will be a useful tool to refer back to after the pieces have been constructed and in the second workshop (colored paper) when combinatorics are introduced.
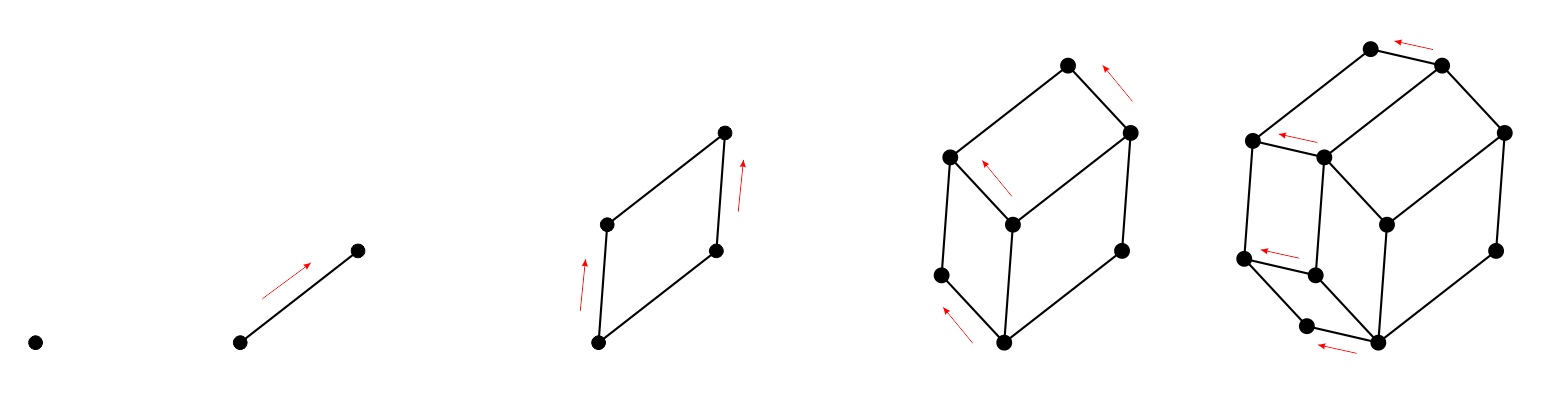
1. Draw a point.
2. From the point draw a line segment with an arbitrary distance and direction, leading to another point which is a translation of the first point.
3. Choose a new direction and distance. Translate the segment to create a new segment in that direction, drawing the lines of motion. This creates a parallelogram.
4. Choose a new direction and distance. Notice that two sides of the parallelogram can be moved in that direction into blank space. Translate those two sides in that direction, drawing the three lines of motion. Now there will be three parallelograms in total.
5. Choose a new direction and distance and repeat the process, adding three more parallelograms for a total of six.
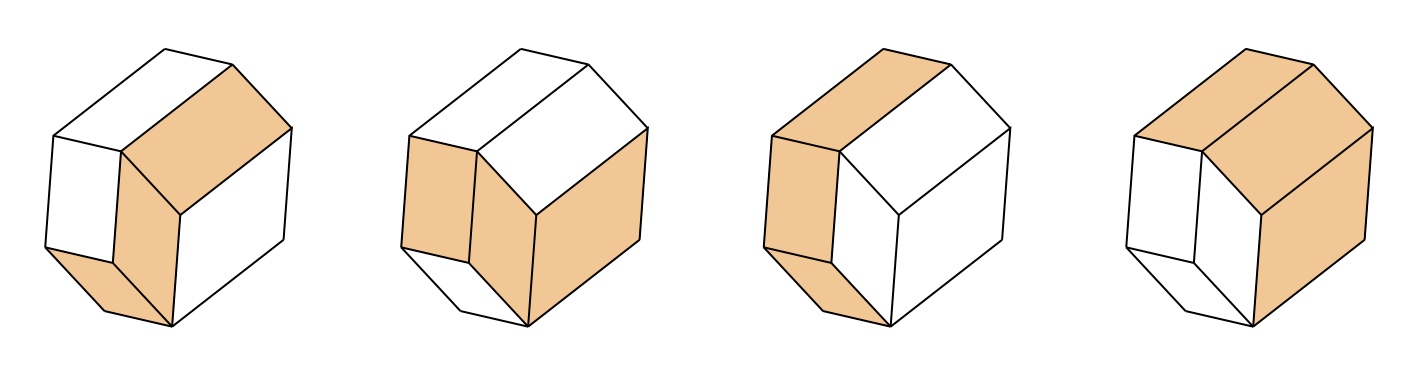
6. For each of your four directions, notice that there is a "belt" of three parallelograms crossing your figure, where each of the three uses your chosen direction plus one of the other three directions. Shade in one belt (any of the four above) and emphasize the parallel edges.
7. Point out that any two belts must intersect because they each go completely across the figure. So there is one parallelogram for any chosen pair of directions.
8. Ask students to repeat the process, with a new set of lengths and directions of their choosing. Encourage them to find the four belts and observe again that there is one parallelogram for any chosen pair of directions.
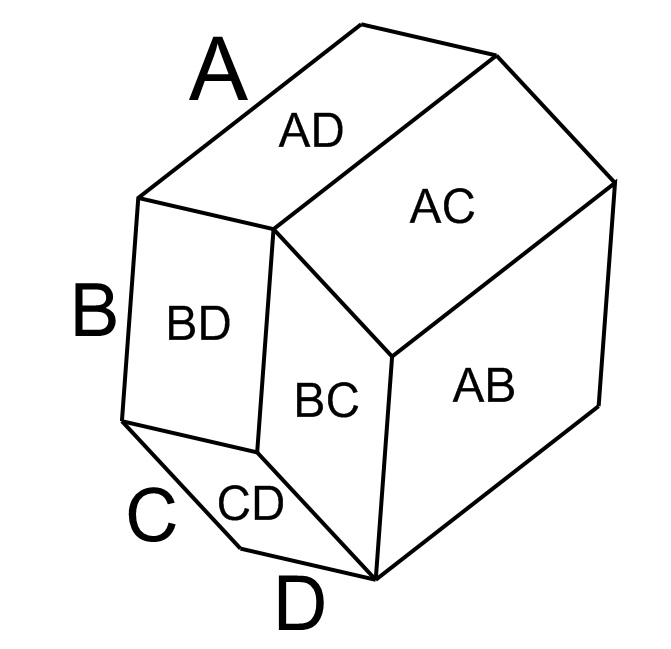
9. This is a visual way to understand that there are six ways to choose a set of two items from a set of four items. From the set {ABCD}, the six possible pairs are {AB}, {AC}, {AD}, {BC}, {BD}, {CD}. The six parallelograms can be labeled according to these six choices of pairs.
Part B. Hands-on assembly of paper blocks
1. Hand out scissors and the printed card stock sheets. Each group needs eight sheets to cut out 120 rhombi.
2. Ask students to cut out the rhombi, being careful to cut neatly on the lines.
3. Engage students in a discussion about the properties of
cubes, squares, and right angles. Ask students to estimate
the angles in the rhombus shape. They will discover that
if they place six of the acute angles around a point, there is a
slight overlap, so the acute angle is slightly more than 60
degrees. Alternatively, they can place three of the obtuse
angles around a point to leave a little gap, showing it is
slightly less than 120 degrees. (In fact, the rhombi of
these templates have an acute angle of roughly 63.4 degrees and
so the obtuse angle is 180 minus that, namely 116.6 degrees.)
4. Ask students what 3D shapes could be made using six of these rhombi. Encourage them to work in groups to hold pieces together forming 3D shapes. Most will discover a kind of pointy "slanted cube." The mathematical name for this shape is a rhombohedron. (It is also a special case of a parallelepiped in which the lengths of the edges are all equal.)
5. Ask students if they can find a second shape that can be made with the same six rhombi. Some should discover a flatter "slanted cube." It is also a rhombohedron. (In the pointy rhombohedron, there is a vertex at which three acute angles meet. In the flat rhombohedron, there is a vertex where three obtuse angles meet.)
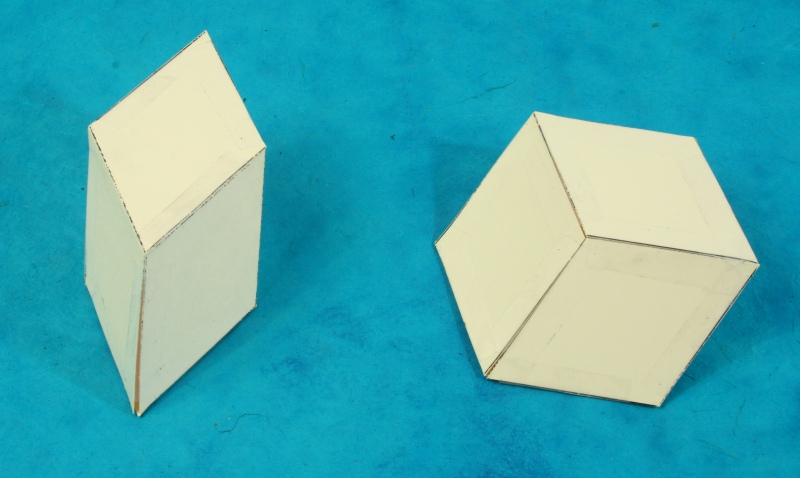
6. It is essential to point out that both shapes have the topology (the connectivity) of a cube, just with different angles. In particular, there are three edges meeting at every vertex. One common mistake we have seen is when students mis-assemble the rhombi and place four faces around a vertex. Warn them to avoid this and be sure to check for it.
7. Hand out the tape and ask students to build ten of each rhombohedron shape per group. Working in pairs is essential for precision. One student can hold two rhombi together, aligning the edges, while the other runs a piece of tape along the entire joining edge. The general process is to keep adding one face at a time --- NOT to make two halves and join them. (We have found that joining two halves leads to errors.) For the last edge or two, you can slide an opened paper clip into a corner of the block creating a force on the inside to push against.
8. For a quick mental math exercise while they are working, you can ask students how many rhombi are required and how many pieces of tape they will need for the complete set of twenty rhombohedra. (Ans: 120 rhombi and 60 pieces of tape.)
9. Point out that the angle of the rhombus was chosen so that these blocks assemble in different ways from cubes. Ask students to explore and play with their set to discover interesting ways that the blocks fit together. They may observe how five pointy blocks fit around an edge to make a star-like assembly.
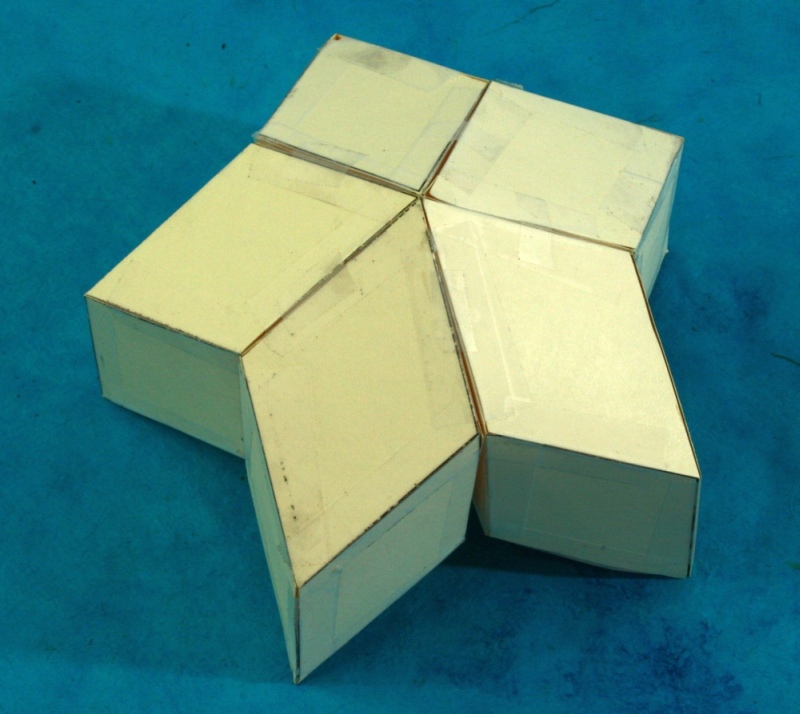
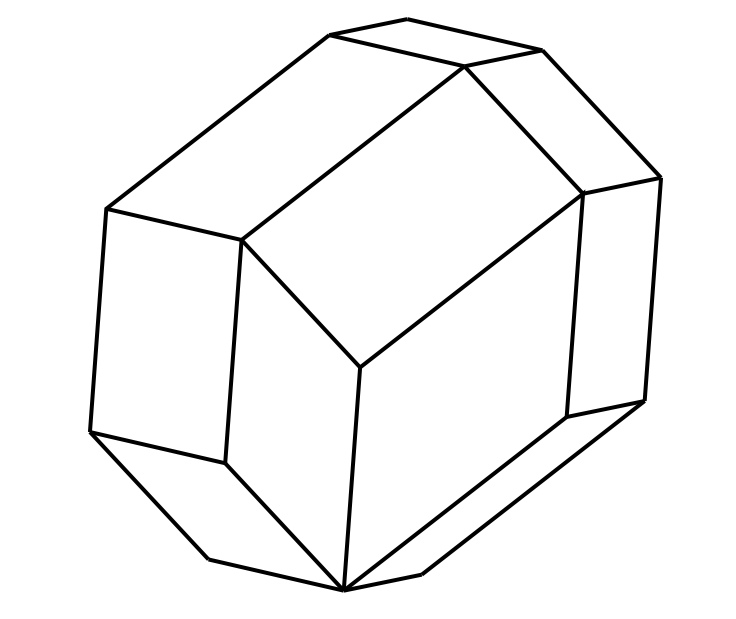
10. Encourage students to see if they can build something which looks like their drawing of six parallelograms. They should discover that two pointy blocks and two flat ones combine to make an interesting shape that looks very much like their drawing. If they hold it together while looking at it from various directions, they should observe it only involves four directions of edges and it has belts going around it as in their drawing.
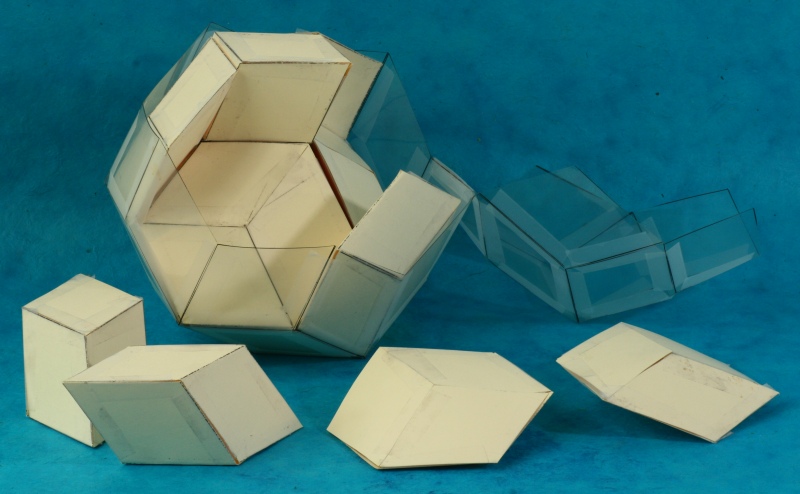
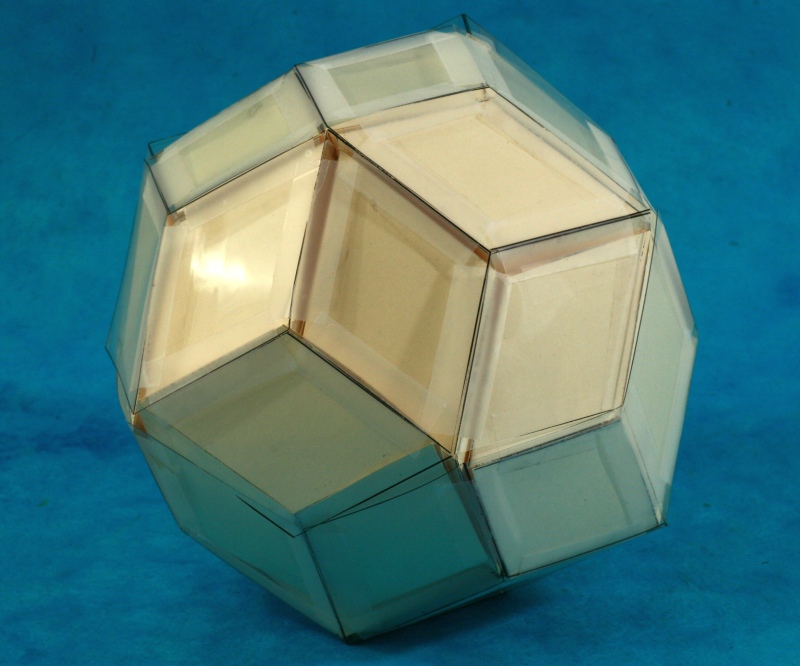
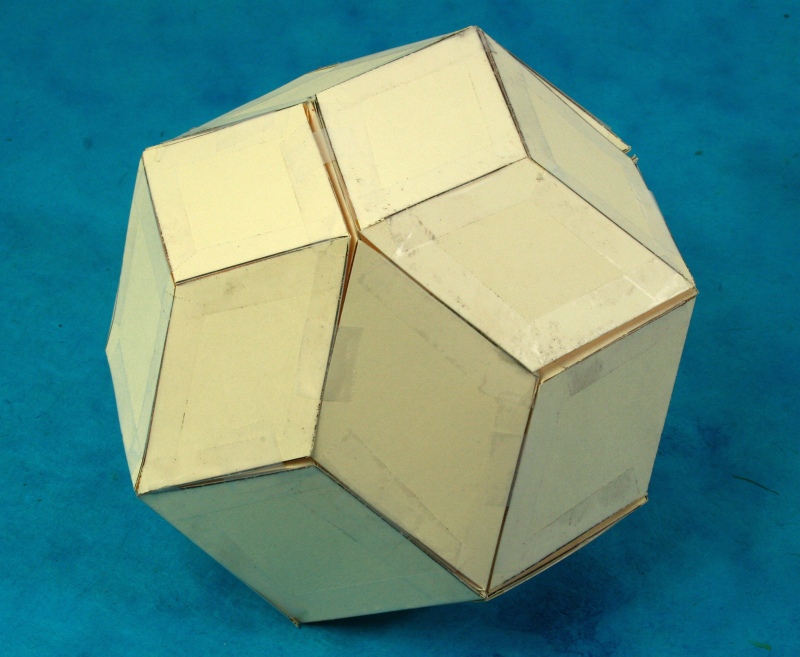
11. Ask students to use all twenty blocks to make a larger orb-like shape. They will need several hands to to hold everything together in the air. They should discover the rhombic triacontahedron. Show your RT model or if no model is available, show this image. Point out that there are thirty faces ("triaconta" is Greek for thirty) and the acute vertices always meet in groups of five.
You can use the students' frustration with the difficulty of holding the pieces together in their hands to get them to think of making a case in the shape of a RT.
Part C. Hands-on assembly of clear acetate case
Materials
- Pencil and paper for drawing
- Card stock printed with template (paper-template.pdf) 8
sheets per puzzle
- Clear acetate sheets printed with template
(acetate-template.pdf)
3 sheets per puzzle
- Scissors
- Clear tape
- A few large paper clips
- Optional model of rhombic triacontahedron,
e.g., made of Zometool
1. It works best if the class is divided into groups of four to eight students. Each group works to make one puzzle.
2. The paper clips are handy for accessing the interior of the blocks when applying tape. Other thin, rigid objects can work as well.
3. We find that a light color of paper looks best as the tape is less obvious.
4. This is one of three related RT puzzle workshops.
Part A. Minds-On
In order to get students thinking about geometric translation, we will introduce a drawing activity that uses parallel lines and translation to create images with parallelograms. Ask students to use paper and pencil to replicate what you draw on the board. The focus should be on parallel lines. This exercise will be a useful tool to refer back to after the pieces have been constructed and in the second workshop (colored paper) when combinatorics are introduced.
1. Draw a point.
2. From the point draw a line segment with an arbitrary distance and direction, leading to another point which is a translation of the first point.
3. Choose a new direction and distance. Translate the segment to create a new segment in that direction, drawing the lines of motion. This creates a parallelogram.
4. Choose a new direction and distance. Notice that two sides of the parallelogram can be moved in that direction into blank space. Translate those two sides in that direction, drawing the three lines of motion. Now there will be three parallelograms in total.
5. Choose a new direction and distance and repeat the process, adding three more parallelograms for a total of six.
6. For each of your four directions, notice that there is a "belt" of three parallelograms crossing your figure, where each of the three uses your chosen direction plus one of the other three directions. Shade in one belt (any of the four above) and emphasize the parallel edges.
7. Point out that any two belts must intersect because they each go completely across the figure. So there is one parallelogram for any chosen pair of directions.
8. Ask students to repeat the process, with a new set of lengths and directions of their choosing. Encourage them to find the four belts and observe again that there is one parallelogram for any chosen pair of directions.
9. This is a visual way to understand that there are six ways to choose a set of two items from a set of four items. From the set {ABCD}, the six possible pairs are {AB}, {AC}, {AD}, {BC}, {BD}, {CD}. The six parallelograms can be labeled according to these six choices of pairs.
Part B. Hands-on assembly of paper blocks
1. Hand out scissors and the printed card stock sheets. Each group needs eight sheets to cut out 120 rhombi.
2. Ask students to cut out the rhombi, being careful to cut neatly on the lines.
4. Ask students what 3D shapes could be made using six of these rhombi. Encourage them to work in groups to hold pieces together forming 3D shapes. Most will discover a kind of pointy "slanted cube." The mathematical name for this shape is a rhombohedron. (It is also a special case of a parallelepiped in which the lengths of the edges are all equal.)
5. Ask students if they can find a second shape that can be made with the same six rhombi. Some should discover a flatter "slanted cube." It is also a rhombohedron. (In the pointy rhombohedron, there is a vertex at which three acute angles meet. In the flat rhombohedron, there is a vertex where three obtuse angles meet.)
6. It is essential to point out that both shapes have the topology (the connectivity) of a cube, just with different angles. In particular, there are three edges meeting at every vertex. One common mistake we have seen is when students mis-assemble the rhombi and place four faces around a vertex. Warn them to avoid this and be sure to check for it.
7. Hand out the tape and ask students to build ten of each rhombohedron shape per group. Working in pairs is essential for precision. One student can hold two rhombi together, aligning the edges, while the other runs a piece of tape along the entire joining edge. The general process is to keep adding one face at a time --- NOT to make two halves and join them. (We have found that joining two halves leads to errors.) For the last edge or two, you can slide an opened paper clip into a corner of the block creating a force on the inside to push against.
8. For a quick mental math exercise while they are working, you can ask students how many rhombi are required and how many pieces of tape they will need for the complete set of twenty rhombohedra. (Ans: 120 rhombi and 60 pieces of tape.)
9. Point out that the angle of the rhombus was chosen so that these blocks assemble in different ways from cubes. Ask students to explore and play with their set to discover interesting ways that the blocks fit together. They may observe how five pointy blocks fit around an edge to make a star-like assembly.
10. Encourage students to see if they can build something which looks like their drawing of six parallelograms. They should discover that two pointy blocks and two flat ones combine to make an interesting shape that looks very much like their drawing. If they hold it together while looking at it from various directions, they should observe it only involves four directions of edges and it has belts going around it as in their drawing.
11. Ask students to use all twenty blocks to make a larger orb-like shape. They will need several hands to to hold everything together in the air. They should discover the rhombic triacontahedron. Show your RT model or if no model is available, show this image. Point out that there are thirty faces ("triaconta" is Greek for thirty) and the acute vertices always meet in groups of five.
You can use the students' frustration with the difficulty of holding the pieces together in their hands to get them to think of making a case in the shape of a RT.
Part C. Hands-on assembly of clear acetate case
1.
Hand out three sheets of the printed acetate per group.
Ask students to cut out 30 rhombi and tape them together in
the form of an RT. Let them design a case with a lid so
the parts can easily be inserted and removed. Note that
these rhombi are printed slightly larger to accommodate the
paper blocks.
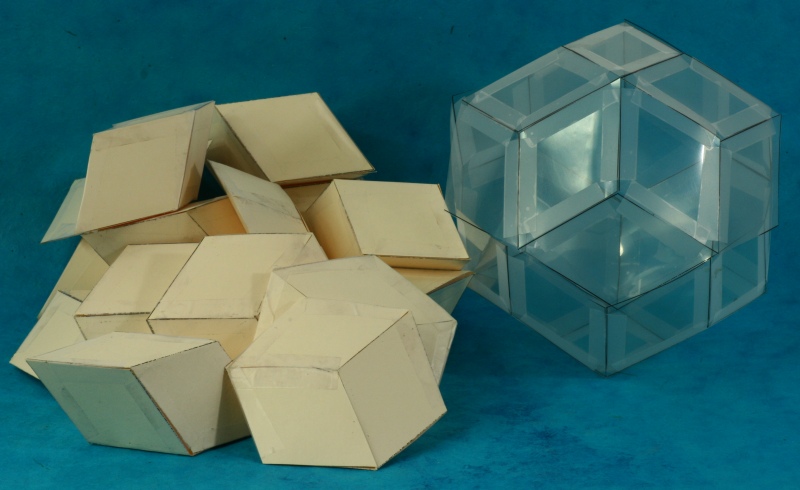
2. Once the case is finished, students can solve the puzzle of packing all twenty blocks into the RT shape.
3. Let students play with the puzzle. They should naturally explore the question of whether there is more than one solution. They may naturally want to compare solutions with each other.
Part D. Conclusion
1. Ask students to find "belts" on the exterior of the RT analogous to what they found in their drawings. They will discover six different "equators" each made up of ten rhombic faces. These belts represent the six directions of edges in this construction.
2. Encourage students to determine how belts relate to each other. They will realize that no matter which two belts they pick, the belts intersect at two opposite parallel faces.
3. Try to get students to visualize that there are only six edge directions on the inside. This is because the directions of the interior block edges are parallel to the exterior edges, due to the way pieces join face to face.
4. To get a deeper understanding of the interior structure of any solution, students can create a 3D analog of the parallelogram drawing exercise by going through the following steps:
5. Place any block in any position at the bottom of the shell. Visualize that this uses three of the six directions.
6. Connect another block to a face of the first block, choosing a new direction. This effectively translates one rhombus in the new direction. Add two more blocks which complete the translation of the original block. You have now made a shape using four of the six directions. This shape was already seen in Step 10 of Part B. If you want to be fancy, it is called a "rhombic dodecahedron of the second kind."
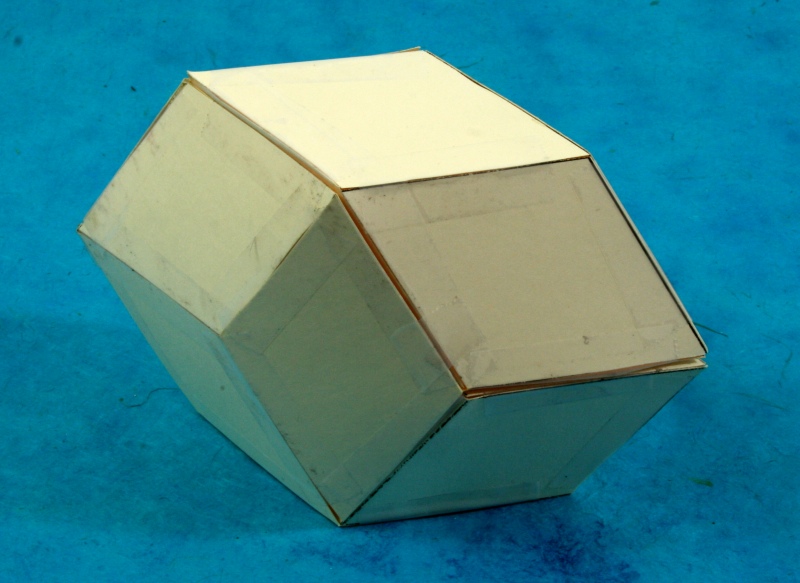
7. Connect yet another block to a face of what you have built so far, choosing a new direction. Again, this effectively translates one rhombus in the new direction and you can add more blocks to complete the translation. You have now made a shape using five of the six directions. It's fancy name is "rhombic icosahedron" because it has twenty rhombic faces.
8. There is one remaining direction and it should be clear how to add the ten remaining blocks to fill the RT shell.
9. Students will realize that there are many possible solutions, because one could choose the six directions in any sequence, moving either up or down in each step.
Possible Explorations
1. You can extend the parallelogram diagram with a fifth direction as in the image above. Can you choose six lengths and directions so the diagram looks like the RT?
2. Notice in the parallelogram drawing that the angles between the chosen directions can not all be equal (because they all lie in the plane) but in the case of the six directions of the RT edges, any two make an angle of about 63.4 degrees. (The rhombi are all congruent.) Ask students to think about this. A clear explanation can come from observing the six long diagonals of an icosahedron.
3. To get more familiar with the rhombic triacontahedron, students can make a model (paper or Zometool) of it and draw in the thirty long diagonals of the thirty rhombi. Those will form the edges of an icosahedron. Similarly, the thirty short diagonals of an RT form the edges of a dodecahedron.
4. For a broader understanding, interested students can read about zonohedra and construct other analogous models. See for example, http://www.georgehart.com/dissect-re/dissect-re.htm
5. Students may discover that in all possible solutions there is always one pointy piece and three flat pieces hidden completely inside. The remaining blocks have at least one face on the exterior. We don't know a simple, concise proof of this. Can your students find one?
2. Once the case is finished, students can solve the puzzle of packing all twenty blocks into the RT shape.
3. Let students play with the puzzle. They should naturally explore the question of whether there is more than one solution. They may naturally want to compare solutions with each other.
Part D. Conclusion
1. Ask students to find "belts" on the exterior of the RT analogous to what they found in their drawings. They will discover six different "equators" each made up of ten rhombic faces. These belts represent the six directions of edges in this construction.
2. Encourage students to determine how belts relate to each other. They will realize that no matter which two belts they pick, the belts intersect at two opposite parallel faces.
3. Try to get students to visualize that there are only six edge directions on the inside. This is because the directions of the interior block edges are parallel to the exterior edges, due to the way pieces join face to face.
4. To get a deeper understanding of the interior structure of any solution, students can create a 3D analog of the parallelogram drawing exercise by going through the following steps:
5. Place any block in any position at the bottom of the shell. Visualize that this uses three of the six directions.
6. Connect another block to a face of the first block, choosing a new direction. This effectively translates one rhombus in the new direction. Add two more blocks which complete the translation of the original block. You have now made a shape using four of the six directions. This shape was already seen in Step 10 of Part B. If you want to be fancy, it is called a "rhombic dodecahedron of the second kind."
7. Connect yet another block to a face of what you have built so far, choosing a new direction. Again, this effectively translates one rhombus in the new direction and you can add more blocks to complete the translation. You have now made a shape using five of the six directions. It's fancy name is "rhombic icosahedron" because it has twenty rhombic faces.
8. There is one remaining direction and it should be clear how to add the ten remaining blocks to fill the RT shell.
9. Students will realize that there are many possible solutions, because one could choose the six directions in any sequence, moving either up or down in each step.
Possible Explorations
1. You can extend the parallelogram diagram with a fifth direction as in the image above. Can you choose six lengths and directions so the diagram looks like the RT?
2. Notice in the parallelogram drawing that the angles between the chosen directions can not all be equal (because they all lie in the plane) but in the case of the six directions of the RT edges, any two make an angle of about 63.4 degrees. (The rhombi are all congruent.) Ask students to think about this. A clear explanation can come from observing the six long diagonals of an icosahedron.
3. To get more familiar with the rhombic triacontahedron, students can make a model (paper or Zometool) of it and draw in the thirty long diagonals of the thirty rhombi. Those will form the edges of an icosahedron. Similarly, the thirty short diagonals of an RT form the edges of a dodecahedron.
4. For a broader understanding, interested students can read about zonohedra and construct other analogous models. See for example, http://www.georgehart.com/dissect-re/dissect-re.htm
5. Students may discover that in all possible solutions there is always one pointy piece and three flat pieces hidden completely inside. The remaining blocks have at least one face on the exterior. We don't know a simple, concise proof of this. Can your students find one?