Rings and Strings
In this workshop, students make string
figures within a circular ring. Ideas of addition,
subtraction, clock arithmetic, multiplication, sequences, and
patterns can be developed while creating an attractive ornament to
display. We provide paper worksheets and templates for
laser-cutting wood rings of various sizes. For first or
second grade students, a circular string pattern in a ring of
twenty or thirty points is sufficiently complex. Older
students can assemble much larger rings and can create a cardioid
after making circles.
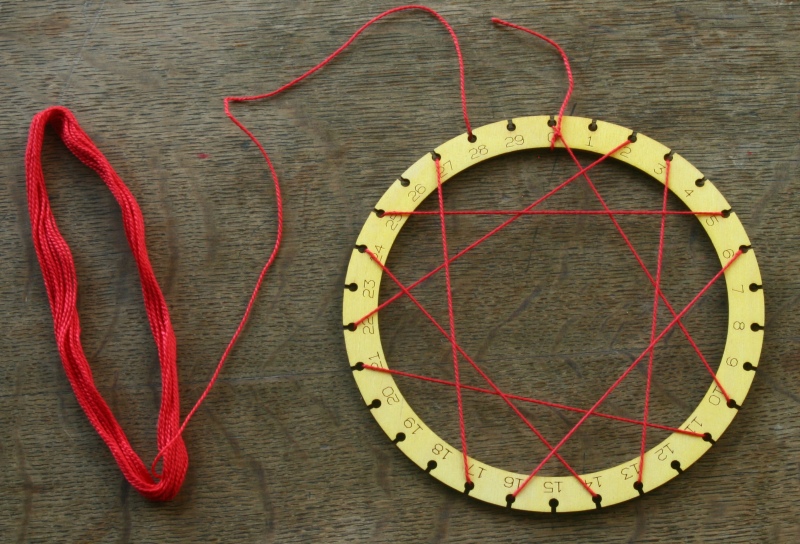
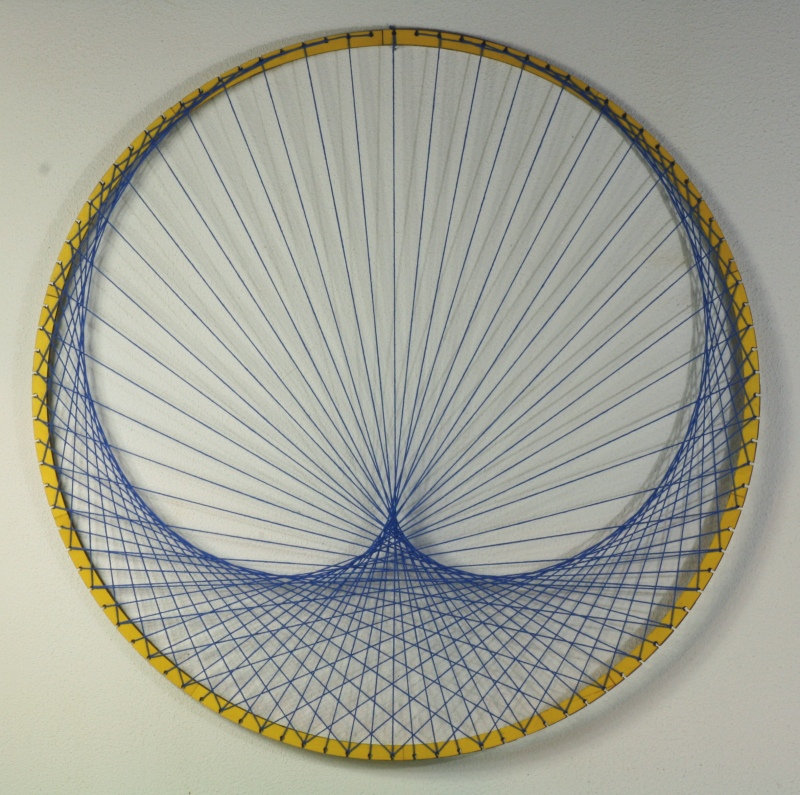
The basic pattern is to connect each hole with the hole k
steps away. This creates a circular opening centered in the
ring, tangent to each string. Doing this with one continuous
string introduces a secondary problem of how to connect the
visible segments using short segments on the back. Then
multiple patterns of different colors and with different values of
k can be combined on one ring to create more interesting
designs. An optional extension is to move from addition to
multiplication, by connecting each hole i with hole 2i,
which creates a cardioid shape from the tangents.
String curves have a long history in mathematics education, going
back to Mary Everest Boole, wife of the mathematician George
Boole. A classic 1906 book
by Edith Somervell popularized the subject. Nowadays, the terms
"curve stitching" or "string art" are used for variations of this
activity; searching for them will produce many additional
resources.
This activity
provides rich classroom material for teachers following the Common Core
Standards for Mathematical Practice. This lesson
also provides cross-curricular connections to art and
architecture.
Detailed
Instructions for String Rings
Time Required: 1 Hour
Materials
- 2 copies of the 30-dot paper handout per student
- colored pencils
- 12-inch rulers or other
straight edges
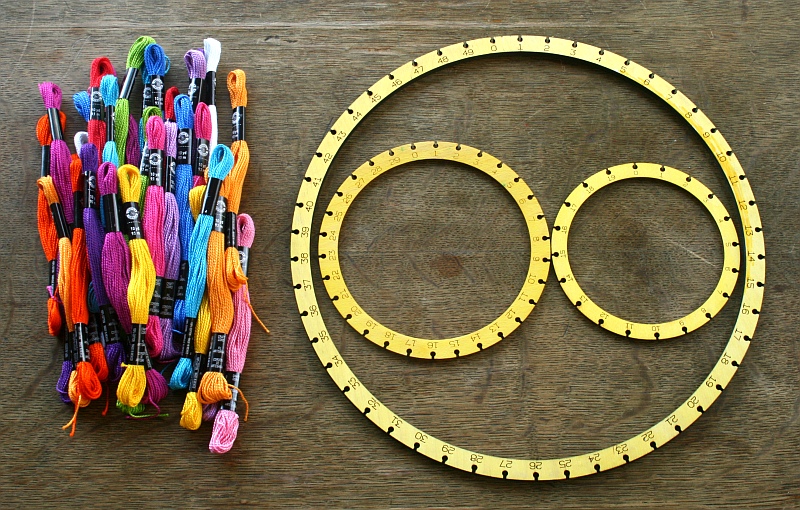
- laser-cut wood rings, using this template (red=cut;
blue=etch)
- embroidery thread (one 8-yard
or 10-yard skein per student, e.g. a
multicolor package like this)
- scissors to cut the thread
- optional: handouts with 50 dots or 100 dots that can be used for
follow-on activities
Notes:
- The ring templates can be scaled
to be larger or smaller in diameter. Select the number of
holes appropriate to your student's level. For elementary
students, a 6-inch diameter, 30-hole ring is a good
start. For 6-inch diameter rings, 1/8 inch thickness
plywood works well. For 1-foot diameter rings, use 1/4
inch thickness.
- Larger rings can be assembled from arcs, as described below.
- We colored the rings shown here with a bright yellow
water-based stain.
- The 30-hole ring, adding by 10 is
the easiest way to begin.
- We found that the string aspects
of this activity are difficult for many second grade students,
even though they can do the "minds on" drawing part.
Part A. Minds On
1. Hand out a pencil, a ruler, and one copy of the 30-dot
handout to each student.
2. Discuss the numbering of the dots. You can point out that
mathematicians often like to start counting at zero. It is a
natural beginning. The dots are numbered 0 to 29, so there
are 30 dots. Tell students that if they ever need
larger numbers, to work as if the numbering keeps goes around,
e.g., on a 30-dot sheet, after 27, 28, 29, you can act as if the
next dots are 30, 31, 32 should you ever need those numbers (even though they are labeled 0, 1, 2). With older students you can discuss
"clock arithmetic" or say to do everything modulo 30.
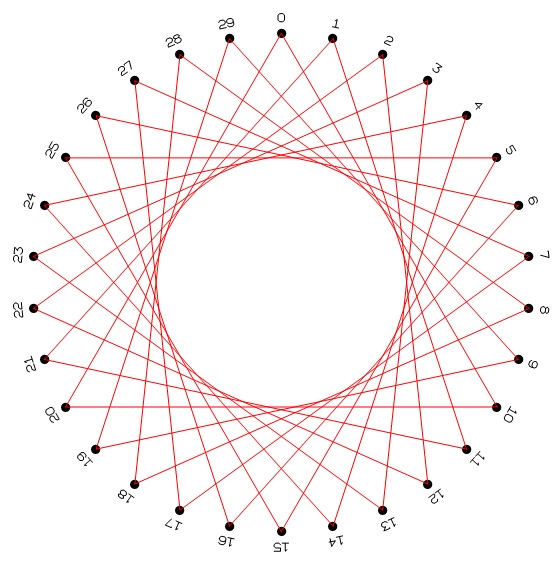
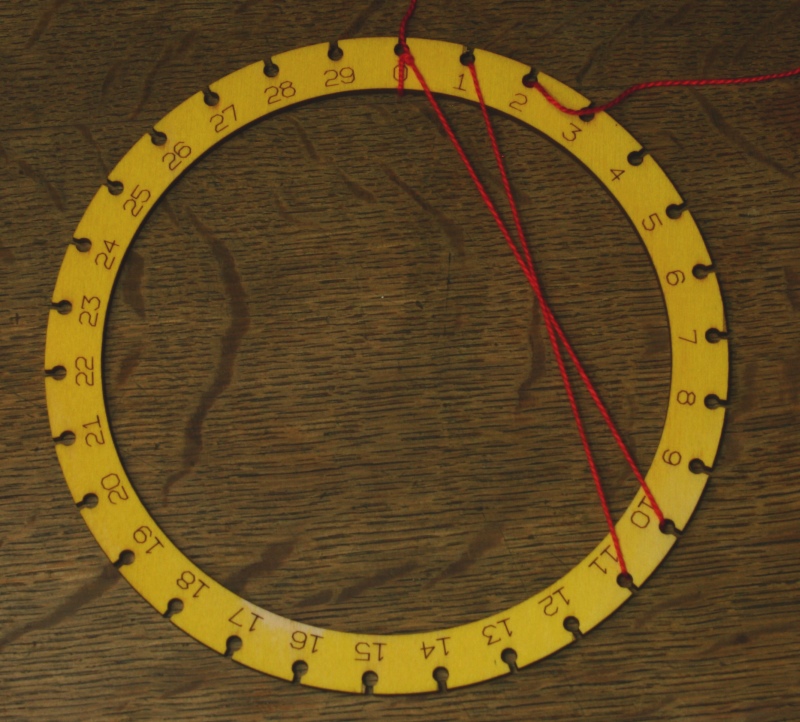
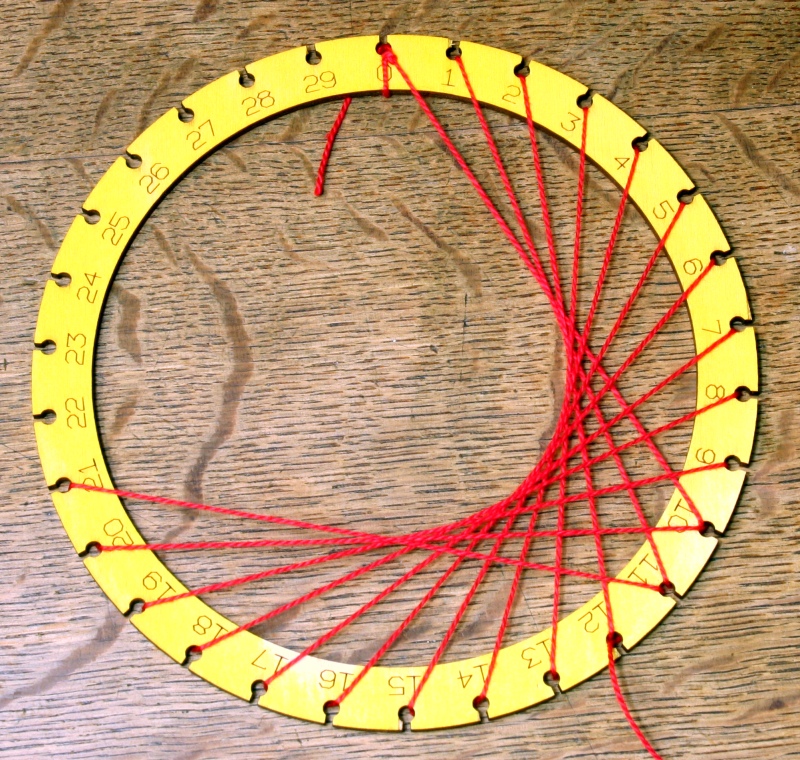
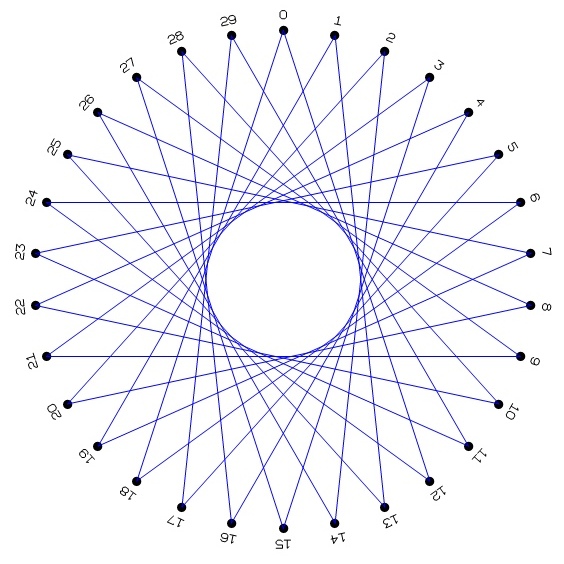
3. Ask students to use their straightedge to draw a line from dot
0 to dot 10. And another line from 1 to 11. And
another from 2 to 12, and generally from each dot i to dot
i +10.
4. For the last ten lines, students will see how the numbers 0-9
are used again to represent 30-39, e.g., the line from 27 to 37
ends at the dot labeled 7. The result should be
like the pattern shown here in red. Point out that "neatness
counts" in the sense that the design will look better if the lines
are straight and go directly from dot to dot.
5. Ask students to choose a
different number than 10 and similarly make 30 lines, each going
from i to i + whatever number they chose.
Call their chosen number k; then each line goes from i
to i+k, for all 30 possible values of i.
This can be done on a new sheet or on the same sheet but in a new
color. At this point, students can be given time to explore,
compare their results, and try to understand the effect of their
different choices for k.
Part B. Hands On. Rings and Strings
7. Hand out a laser-cut wood ring to
each student. [Note:
these instructions assume you use a 30-hole ring; Adjust if you
use the ring with 20 holes (for first grade students) or 50 holes
(for older students).] Tell
students that instead of using pencil and paper, we can stretch a
string between two holes to make a line. Give each student a
skein of embroidery string (typically 8 to 10 yards). Before
starting, ask them to think about the difference between drawing
lines and threading the string. How can the pattern be made with
one continuous piece of string?
8. Students can each choose whether the side with numbers or
the side without numbers will be the front. Every time the
thread goes through a hole, it switches from front to back or
from back to front.
9. Explain to students that they will run the thread
through the holes of the ring to make a pattern, but that we want
the pattern to be all on one side of the ring, so it can be fully
seen, not partially hidden on the back. Whatever side is
front, we want the lines we "draw" in thread to be on the front,
so we need to make short connecting hops on the back of the ring,
analogous to when you lift up your pencil at the end of one line
and move to the start of the next line. Ask if there is a
systematic way to do this. Discuss ideas. One thing to discuss is that it will look
the same in the end no matter what order the strings are placed;
you don't need to do the strings in the order 0, 1, 2, 3, ..., as
long as each string segment is the same length and you eventually
do all thirty of them. And another idea is that a sting from a
to b looks just like a string from b to a,
so it would be OK to go backwards if that ever helps.
Note: There are two natural ways we have found to run the
strings continuously, using short hops on the back. We call
them the "Back and Forth" method and the "Skip Around"
method. The back-and-forth method is slightly more complex,
but works the same way for any k. The skip around
method is more symmetric and more interesting to think about how
and why it works, but you have to pick a good move for the back
depending on the choice of k, so we recommend it for older
students.
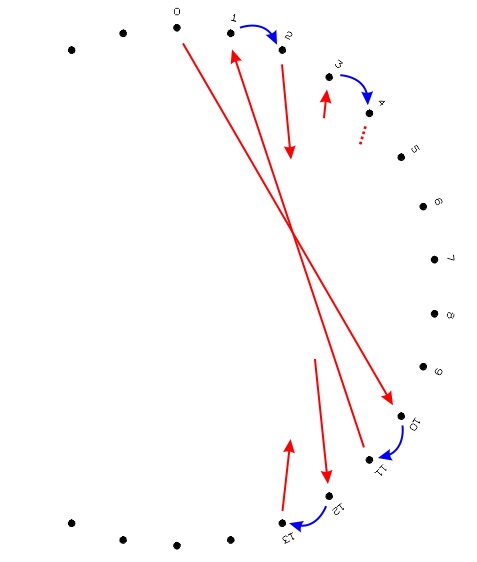
10. The Back and Forth Method.
The easiest way to make all the lines is to alternate going
forward and backward, e.g., going forward from i to i
+ k when i is even and going backward from i
+ k down to i when i is odd. (It
is easier to do than to explain.) For example, if k
is 10, go from 0 to 10 on the front, then to 11 on the back,
and from 11 down to 1 on the front. Then go from 1 to 2
on the back and you are ready to go forward again. In
this way, the segments are made in order 0, 1, 2, 3, ..., but
half of them are done "backwards" from the high number to the
low number.
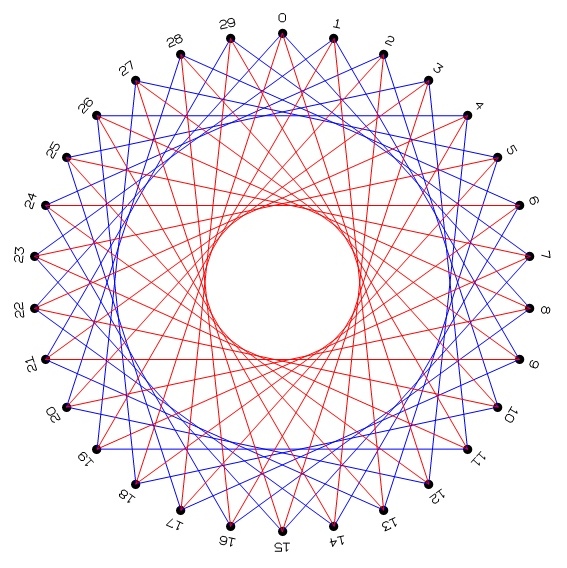
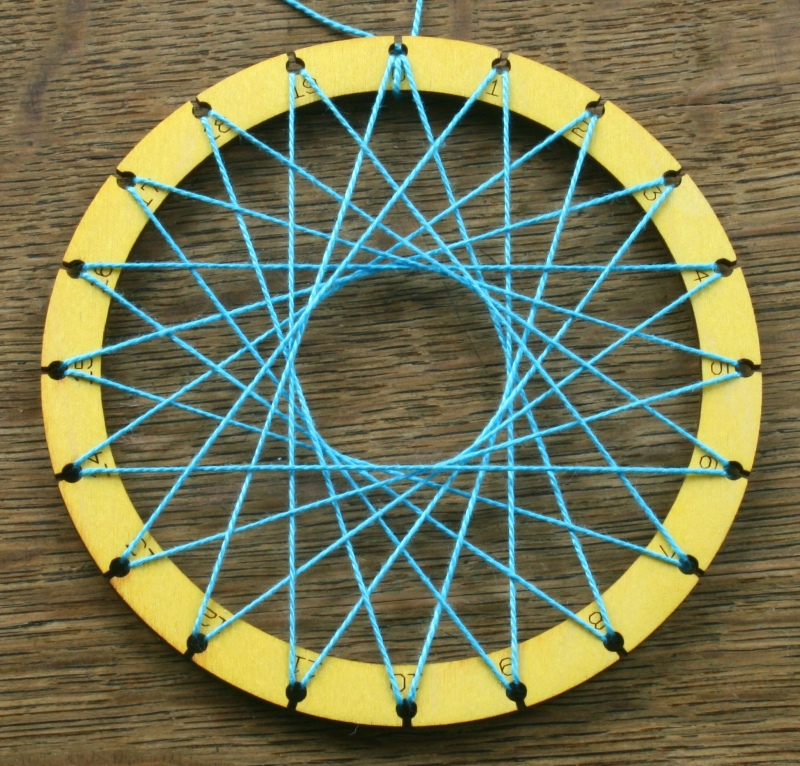
11. Explain the method, perhaps drawing a
diagram on the board like the
image above. In this diagram, the red represents the
segments on the front that we want to "draw" with the
thread. The blue represents short hops on the back to move
us to the next segment.
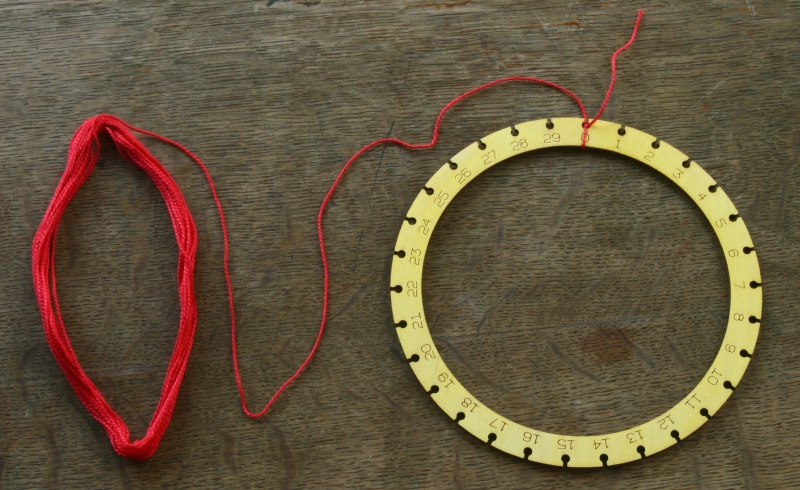
12. Ask students to open the embroidery
thread, being careful not to tangle it. Wrap the end
around the 0 hole and tie a knot to start the thread and
prevent it from getting loose. Leave a bit of the end
hanging; it will be useful later, to tie off the end when
complete.
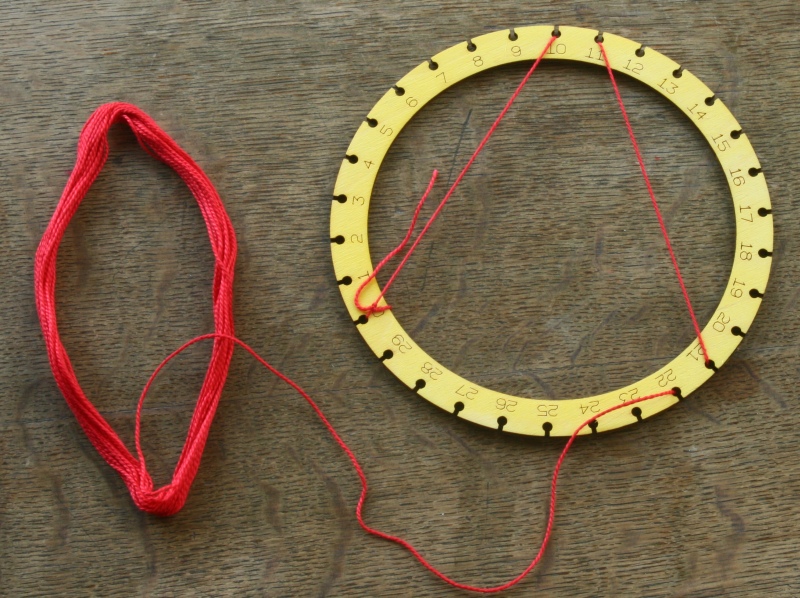
13. Go from 0 to 10 on the front, to 11 on the back, from 11
down to 1 on the front, then to 2 on the back. This is
one back-and-forth sequence. Keep
the string fairly tight, so the lines stay straight and
will not fall out of the holes.
14. Continue with the back-and-forth moves. You go
forward k from the even numbers and you go back k
to land on the odd numbers. After each back-and-forth,
you have completed two of the 30 desired lines and made two
small connecting hops on the back.
15.
You should eventually end up back at 0 after making all 30
segments. Check that everything is correct
and tie off the end. You can leave a hanging
loop for displaying it.
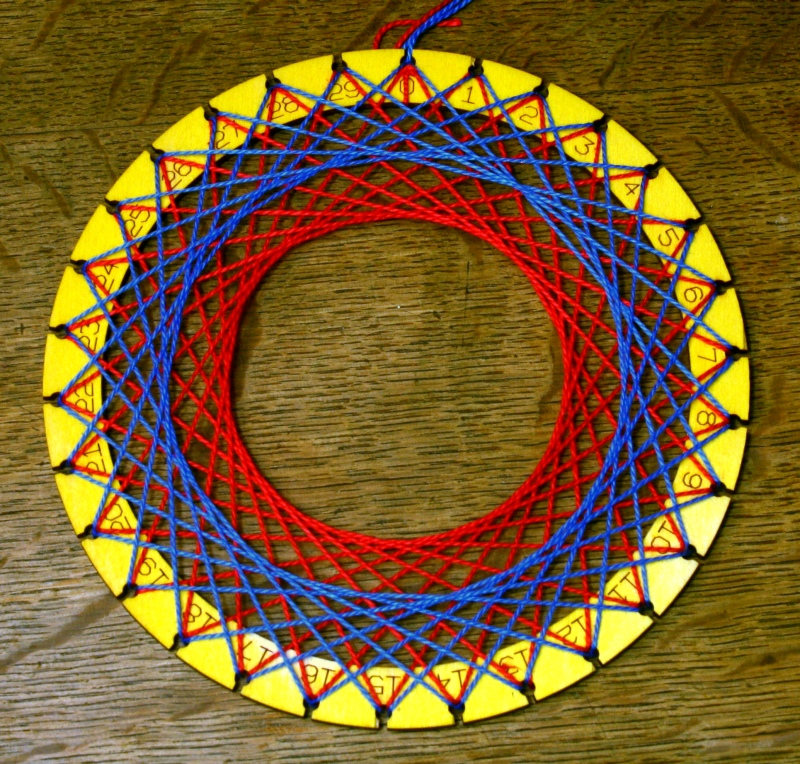
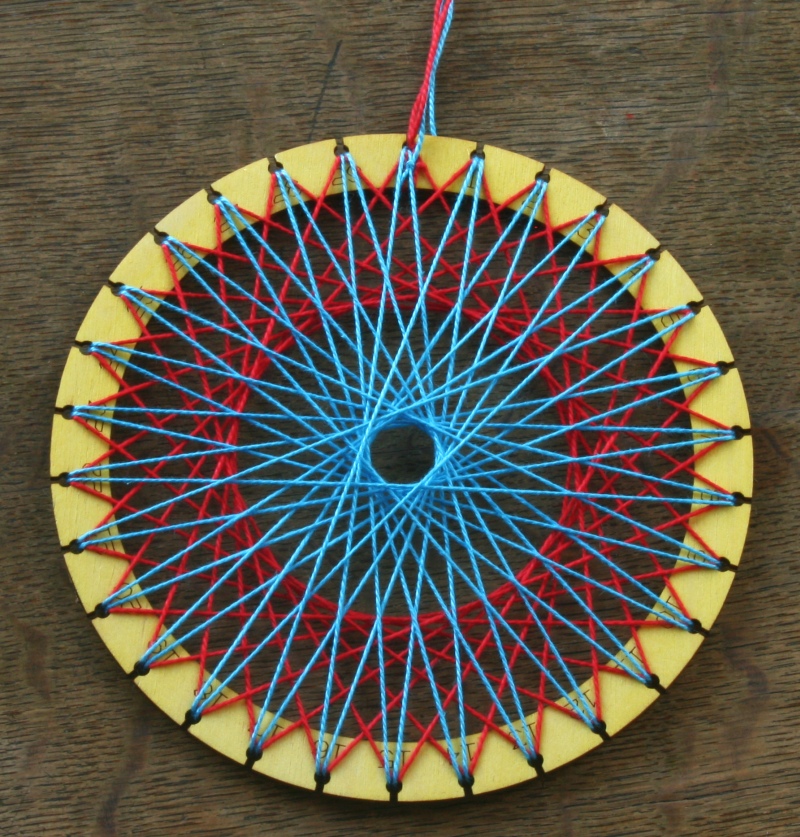
16. When finished with all 30
segments, optionally add another set of 30 strings in a
different color with a different choice of k.
The above example started with k = 10 in red, then
added k = 8 in blue.
Young students may need help to focus on the algorithmic
aspects of the string pattern even after they master the
drawing.
A variation that some students find natural with the string is to
go +10 on the front and -9 on the back.
Here are steps 10-16 again, using the
Skip Around method.
10. The Skip Around Method.
This is a much better mental exercise in addition. Let k
be the chosen "adder," so each line is to go from some i
to i+k. In this method we always move forward
k on the front then make a small move on the back which is
always the same. For example, if k = 10 on a ring
of size 30, go from i to i+10 on the front, then
forward one more to i+11 on the back, then make make
another forward +10 on the front, then move forward one more on
the back, etc. In this way, all 30 lines eventually get made, but in a different order.
11. Ask students to open the embroidery thread, being careful not
to tangle it. Wrap the end around the 0 hole and tie a knot
to start the thread and prevent it from getting loose. Leave
a bit of the end hanging; it will be useful later, to tie off the
end when complete.
12. From 0, on the front go to k. On the back go to
k + 1. Continue the pattern: on the front add k;
on the back add 1. Keep
the string fairly tight, so the lines stay straight and will
not fall out of the holes.
Continue in this
way, always going +k on the front and +1 on the back.
13. You should eventually end up back at 0 after making all
30 segments. But if you made even one addition error along
the way, then you will see it doesn't close up properly. After checking
for correctness, tie off the end. You can leave a
hanging loop for displaying it as above, when finished with all 30
segments.
14. Students may now add another set of 30 strings in a different
color with a different choice of k. They should discover that the method works
well for some choices of k, but fails for certain other
choices of k. This is an opportunity for them to
analyze and mathematically model the situation.
15. With older students, you can ask: What if k was
14 and you tried this? It wouldn't work! You would go
from 0 to 14 on the front, then +1 to 15 on the back, then +14 to
29 on the front, then +1 on the back brings you to 0 again, and
that hole is already complete. One approach is that whenever you come
to the front where you already have a string , just move forward
an extra one on the back, to get to a new position that needs a
string. This works fine, but a mathematical purist will be
unhappy that the back isn't perfectly symmetrical. A different
approach for k = 14 is to go -1 on the back each time
(instead of +1 every time). This works consistently for
all 30 lines. One can experiment and see that going -1 on
the back would not work when k=10, though +1 on the back did
work. So for each k, there are choices for the back which
do not work and choices which do work. Which work? This is
a good problem to pose to students familiar with prime numbers
and factoring. They may want to use the sheets with
numbered dots to help understand the cases.
Example with 20-Hole Ring
For this example, you can go +8 on the front and -1 on the
back.
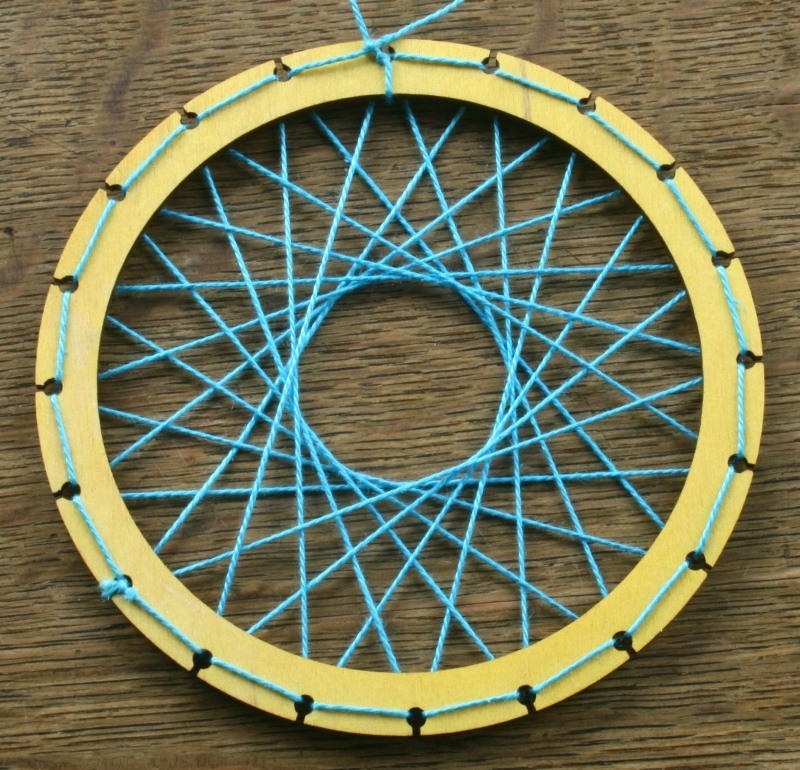
The back has all the -1 steps.
Here, we have added a second layer, going +6 on the front and +1
on the back.
Part C. Conclusion
With older students, you can discuss why the back-and-forth method
always works and why the skip around method only works for certain
choices of what to do on the back. For some choices you end
up back at 0 before all 30 lines have been drawn. To
understand what is happening, think about the net motion after
moving k on the front and j on the back.
This brings you to a new hole on the front, where you
repeat. If k + j divides evenly into 30,
then it ends too soon and you need to do something a little
different on the back to continue. If k + j
is 7, 11, or 13, it works fine, e.g., 10+1 or 14-1. In general, if k + j has any
divisor greater than 1 in common with the number of holes, the
process ends too soon. So
you can first choose k for its aesthetic effect then choose
j to make k + j have the value you
want.
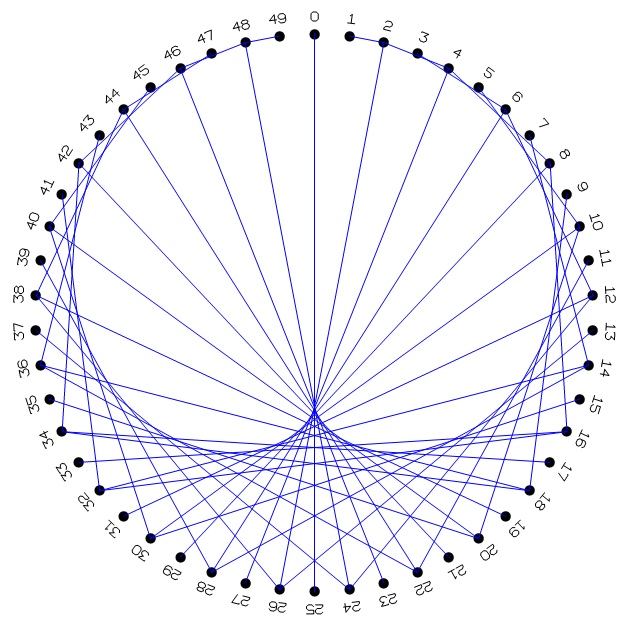
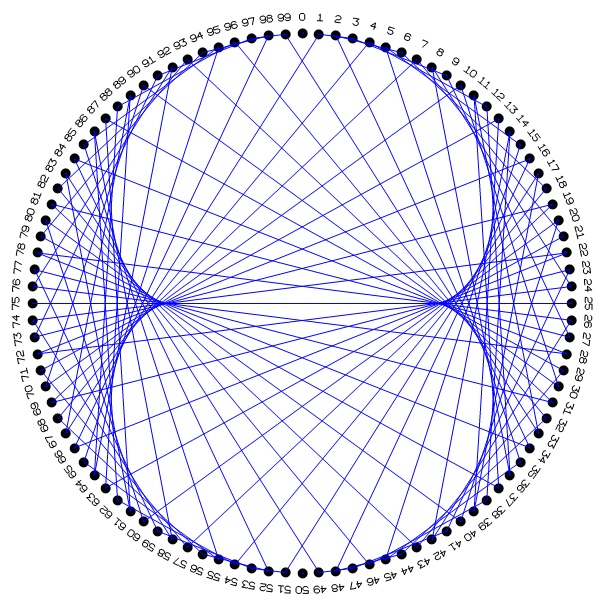
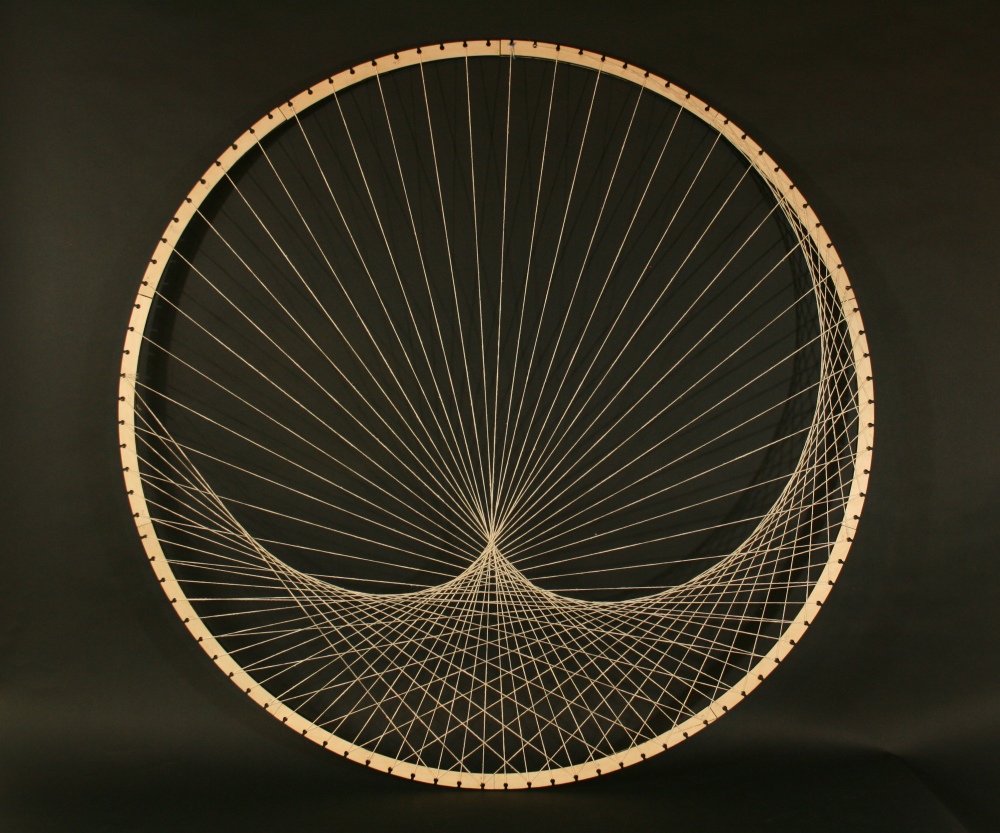
Part D. Optional Extension. The Cardioid
Ask students to consider
using a larger ring, with 50 or more holes, and connecting each hole i to hole 2·i. Hand
out a sheet with 50 numbered dots and ask students to draw this on paper
first. They should discover that the strings outline (i.e., are
tangent to) a curve called the "cardioid," because it is heart shaped, as
shown above. Note: A 30-dot sheet is not recommended.
The shape
does not stand out very clearly if there are fewer than 50
lines.
Ask
students to plan how they might make the
connecting hops on the back before starting
construction. Discuss
ideas. A modified version of the
back-and-forth method works well here, going +1 on the
back of the ring at the i end of each segment and +2 on the back at
the 2i end of each segment.
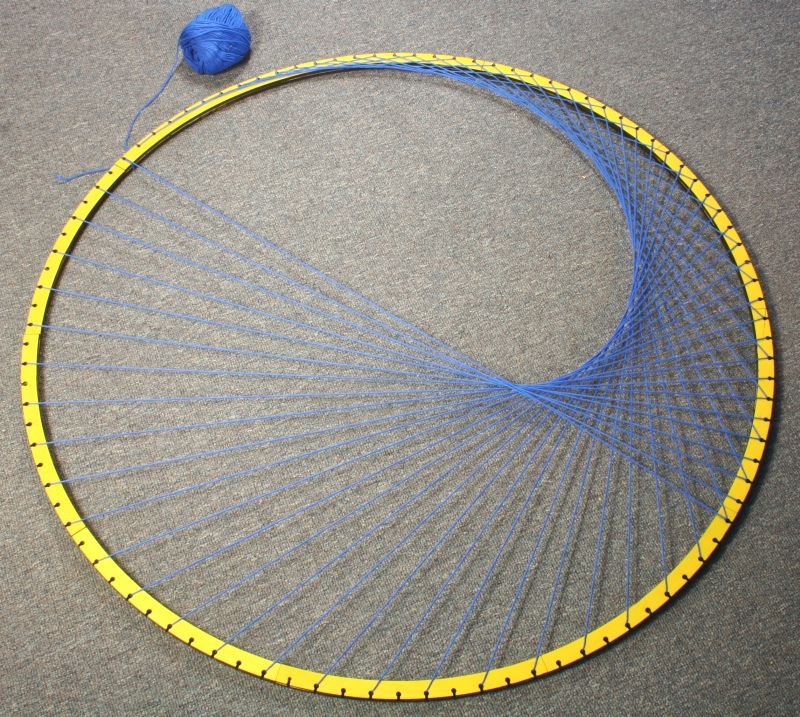
Hand out larger rings or show
students how to create very large rings, as described
below. If
making a 50-hole cardioid, have a length of string
available equal to 40 times the diameter. For a
100-hole cardioid, have 70 times the diameter.
Colored yarn works well with the larger rings.
For
the modified back-and-forth method, start by attaching the string at 0,
going on the back to 1, on the front to 2, on the back to
4, on the front to 2, on the
back to 3, on the front to 6,
on the back to 8, on the front to 4, on the back to 5,
on the front to 10, on the back to 12, etc.

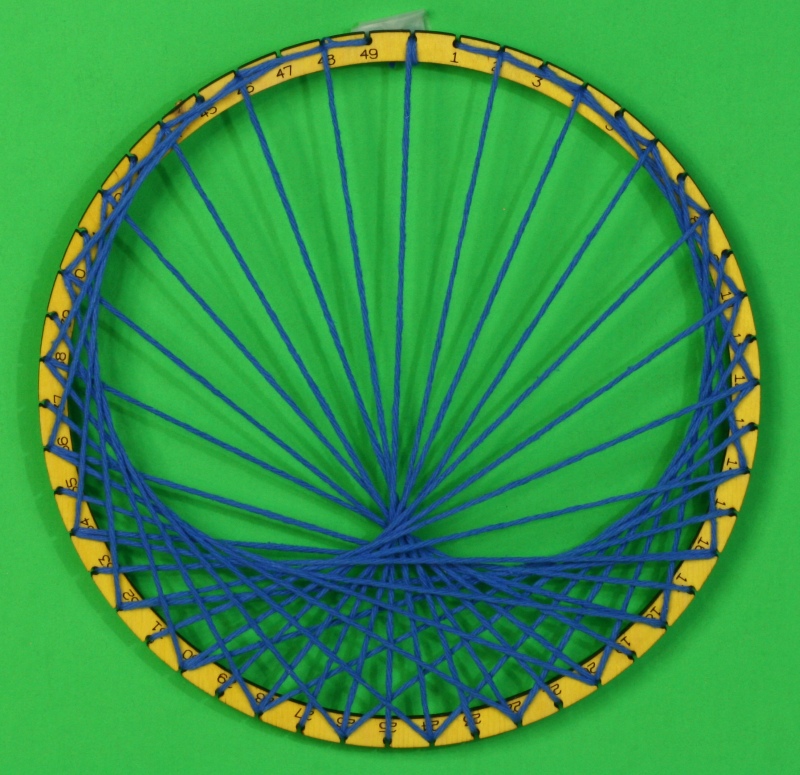
Above
is the state on a 100-hole
extra-large ring after the i end has reached 25 and the 2i end
has reached 50.
Above is the halfway
point. The 2i end has made a complete revolution
while the i end has gone half way around. The completed
cardioid is shown at the top of this page.
Optional Extensions
Beyond the cardioid.
If you connect hole i to
hole 3i you get the
two-lobed pattern at left above, called a "nephroid." If
you connect i to 4i, you get the
three-lobed pattern at right.
This one does not have a special name as far as I know, but it
is "an epicycloid of three cusps" just as the nephroid is an epicycloid of two cusps and the cardioid is an
epicycloid of one cusp. These need a
ring with more than 50
holes to be clearly visible.
Predict what happens if you choose some other k and
connect each hole i
to hole k·i.
Other Materials. Find other materials to use as the ring, e.g., a hula hoop or
an old bicycle rim. Or
bend a long thin strip of wood into a circle and mark locations
to attach the strings. You can run string between nails
hammered into a wall or a board.
Larger Versions. Can you
paint a mural-size
version? Or use sidewalk chalk in a parking lot. How
would you mark n equally
spaced points on a very
large circle? How would you draw the long straight
lines between points?
Detailed
Instructions to Make Larger Rings
Time
Required:
-
0.5 hour to
glue, not including drying time and attaching the strings
Materials
Notes:
- The above activity with one-piece rings should be done first,
so students understand the purpose of these larger rings.
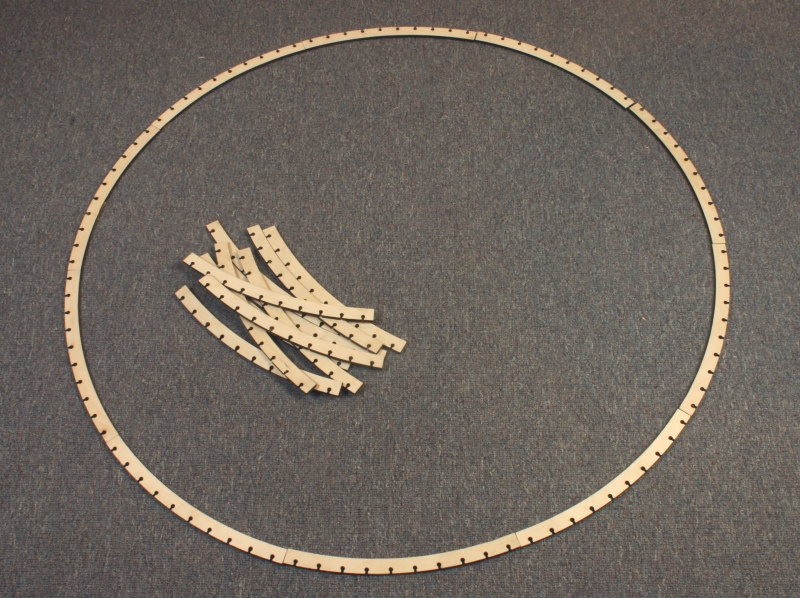
- The arc is one tenth of a circle,
but 20 pieces (two full circles) are required to make a ring,
because of its double-layer construction.
- These templates are scaled to
make a ring three feet in diameter with an efficient use of
wood. They can be scaled to arbitrary size. To ensure rigidity, if you scale them to be larger, either
use thicker plywood or extend the process below to use 30 arcs
in three layers.
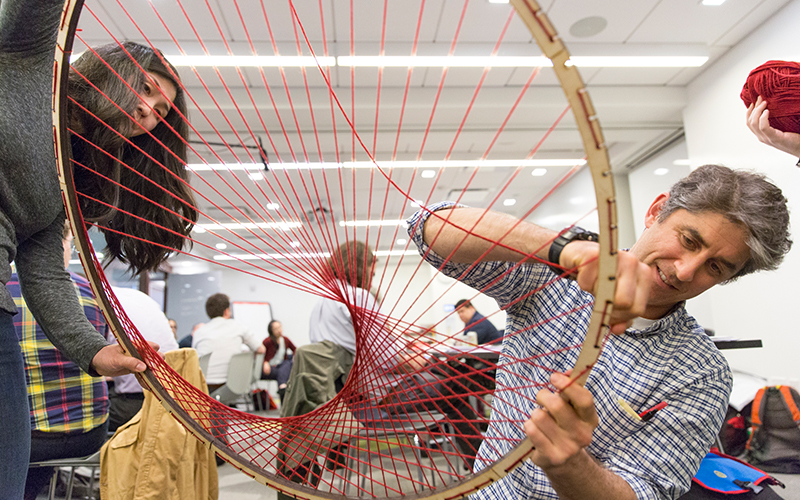
- Students can work in groups of two to four to make a ring,
then string it as a group.
Steps
1. Distribute the
parts to the groups. Ask students to lay out ten pieces in a neat
circle on the floor, so they get a sense of its scale.
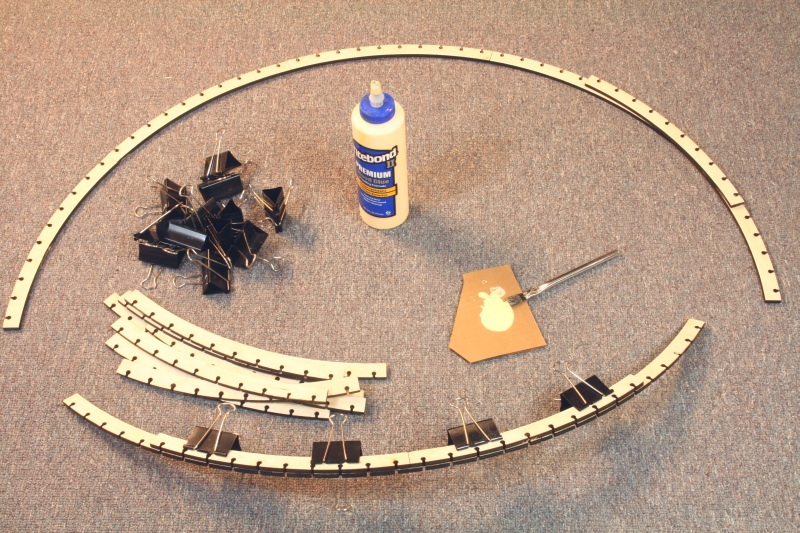
2. Ask students to lay
out the second set of ten pieces on top of the first ten, so each
piece in the top layer halfway overlaps two pieces in the
bottom layer. (For the 60-hole ring, each arc has 6 holes,
so there should be a 3-hole overlap. For the 100-hole ring,
each arc has 10 holes, so there should be a 5-hole overlap.)
3. Hand out glue brushes and squirt some glue on to a
scrap of cardboard or a similar palette for each group.
4. Instruct students to
carefully brush glue on both surfaces that will join and to use just
a small amount of glue---just enough to wet the surfaces. Too
much glue makes a mess, takes longer to dry, and doesn't make the
joint any stronger.
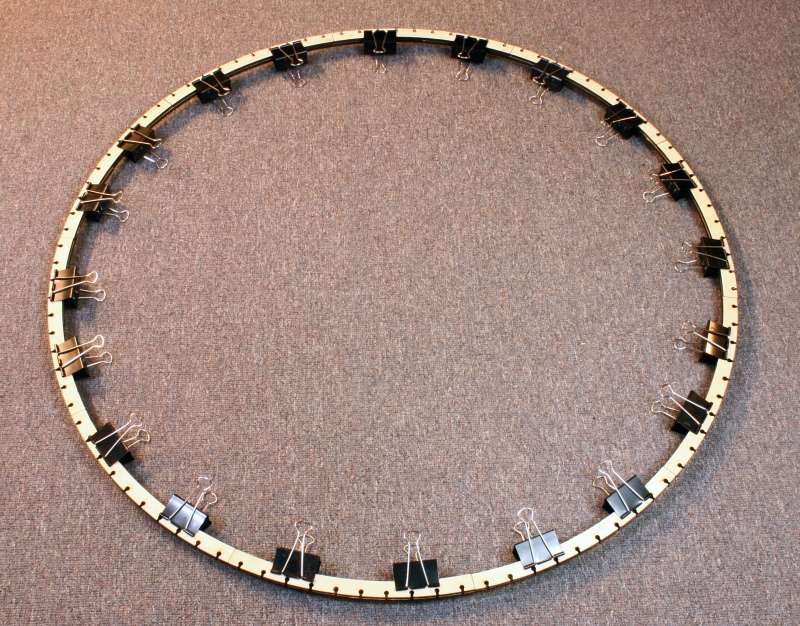
5. Use the clamps to hold the two layers together. Be sure the
holes are well aligned, as the string will have to pass through both
layers. Wipe off any excess glue with a paper towel.
6. Allow undisturbed
drying time for the glue to harden before removing the clamps.
7. The holes can be
numbered with a pencil. It is sufficient to just label the
multiples of 5.
8. Use the rings as
above to make large, impressive string figures. Colored yarn
works well. Above is a three-quarters complete cardioid on a
3-foot diameter ring of 100 holes.
9. You can see
the back of the ring here, which makes clear how the back and
forth method works.