Making Math
          Visible

Autumn

Geometric Sculpture I


Autumn is a geometric sculpture which students assemble from sixty identical laser-cut wood components.  Cable ties are used to connect the parts together.  The construction activity is a fun group exercise in spatial reasoning which makes clear how mathematics can be applied to art, architecture, and design.  The result is a beautiful 24-inch diameter orb that can be displayed in a school or classroom to help make math visible to students and the community. It will serve as a focal point that sparks mathematical conversations.

We have colored the example above with several Fall colors, but students may prefer to try their own creative coloring ideas.

Time Required:  1 hour for Assembly (not including cutting and optional staining)

Materials:
Notes:
1. This is the first of four related geometric sculpture activities.
2. To get the most from this activity, students should be familiar with the Platonic solids and their axes of rotational symmetry.  We recommend doing that workshop first.
3. Many young students find cable ties challenging.  We recommend this activity for grade 5 through adult.
4. Only 120 cable ties are needed for the design, but have extras available because some mistakes will be made, which need to be clipped and discarded.
5. The first time you build this, don't try to make a color pattern (as in the image above), just focus on the geometry.
Part A: Preparation

1. Laser-cut the parts.   Smoke marks can be minimized by applying laser-safe tape to the bottom surface before cutting, or the surfaces can be lightly sanded afterward.  A quick light pass on both sides with an orbital sander (150 grit) removes smoke marks and gives the parts a smooth tactile surface; it is optional, but recommended if you are staining the wood.


2. The four straight segments of each part should be beveled slightly so they come together at the proper dihedral angle.  This is very fast and easy if you have access to a disk sander or a belt sander.  The following might seem like a lot of instructions to explain everything clearly, but the actual work is very quick---only a small amount of material needs to be removed, so it takes just a slight touch for one second for each edge.  The tricky part is that there are two different bevel angles and two of the edges need to be beveled on the front and the other two on the back, so you need to keep track of which side is which, as detailed in the following two steps:


3. The two longer edges, which meet at a sharp vertex, should ideally be sanded with the table tilted 54 degrees down from horizontal.  However, many sanders only allow the table to tilt to a maximum of 45 degrees, and that will work fine.  We want to remove material from the back surface, so ensure that that side is down. You only need to remove a slight amount of material---half the thickness of the wood is plenty.


The image above shows what the edges look like after beveling.  Note that it is important that the bevel be equal all along the length of the edge.


4.  For the two short edges, the wood is turned over and the table should be set to 18 degrees.  The front face is down so we remove material from the front face.

5. Optionally, the parts can be stained.  We used five different Fall colors for the example shown above and followed a specific coloring pattern described in the explorations below.  But the first time you build this design, you might want to work with the unstained parts or use a solid color and focus on the geometry.  To stain the parts, brush on a water-based stain with a foam brush and wipe off the excess with a paper towel.  Let dry.

Part B: Hands-On


1.  Give students a quick safety briefing about how to use cable ties: Cable ties should only be used for construction and can be dangerous if placed around any part of the body.  If students are unfamiliar with them, you may need to explain how the tip must go in to "the flat side" of the box.  It comes out "the bump side."  And it must loop like a cylinder, not twisted like a Möbius strip.

2.  Organize students in groups of two or three.  Hand out three pieces to each group. Ask students to explore the pieces and ask them how three might fit together to make a three-piece module.  
 
3. In order to familiarize students with the parts, ask them to describe the shape and discuss observations such as the following:  All the parts are identical.  The boundary consists of various curves and four straight segments, each with a small hole nearby.  Two of the segments are longer and meet at a vertex; the other two are shorter and don't meet. Each edge has been beveled slightly.  Point out that the straight segments are the connecting edges of each part, and the hole is where a cable tie will be used to connect it to another part.  Beveled surfaces will meet with one another.


4. Explain that each group will initially make a module of three pieces with three-fold rotational symmetry.  They will be joining the longer edges together to make something like the top of a tetrahedron.  It is important to understand which side is to face outwards.  If the beveled surface is facing outwards, that is incorrect.  If the beveled surfaces mate with each other, that is correct.


5. When students have the parts positioned properly, hand out three cable ties to each group so they can connect the parts.  Explain that each tie goes through two holes, making a loop and "sewing" the parts together.  A gentle tug while wiggling the tail will snug up the connection.


6. Check each module to ensure the parts are properly joined and the ties are tight.  You can snip off the tails with the wire cutter as a mark of which modules you have checked.


7. The class now needs to work together to assemble the modules.  One way to begin is to pick five groups for the first stage and ask one person from each group to bring their module to the front of the room.  Ask them to position them to make a 5-fold star, as shown above.  They will now be joining the short segments.  Suggest that they use symmetry as a guide for how the parts join, along with the principle that their beveled surfaces should mate together.  They should see that there are ten places they can now add a cable tie to connect these modules.  (Five are near the center of the image above and five are on the sides.)  While the first five people continue to hold the parts, ask for a second person from each group to come up and make two of the cable tie connections.  Hand out ten ties for this.


8. After this, the students should see the pattern and be able to complete the structure, making similar 5-fold stars everywhere.  Tell them that they should make only 5-way stars, never 4-way or 6-way. A general tip is that one student can hold a piece in position where it is to be attached while another student connects the cable ties.  Depending on the group, you can work in a very structured way, organizing them to add five modules at a time symmetrically, or you can let them explore and decide for themselves where and in what order to add their modules.  It is safest to keep adding modules to a single growing structure.  (It would not work to try making two separate "halves" and hope they fit together!)  Encourage each group to have a turn then make room for others.  Allow them to answer each other's questions about where to connect everything.  Students will see the patterns and figure out how to extend them to complete the sculpture.  Those who are waiting can take three more parts and make another module until all twenty modules have been built.


9. When complete, check all the connections are correct, all the cable ties are tight, and snip off the ends of the ties.

10. While working, you can ask students who aren't engaged in the construction to figure out how many cable ties are needed all together.  From the fact that there are 60 pieces and each touches four others, they should determine there are 120 cable ties.  That's 60·4 = 240 connection locations, but divided by two because each tie joins two connection locations.


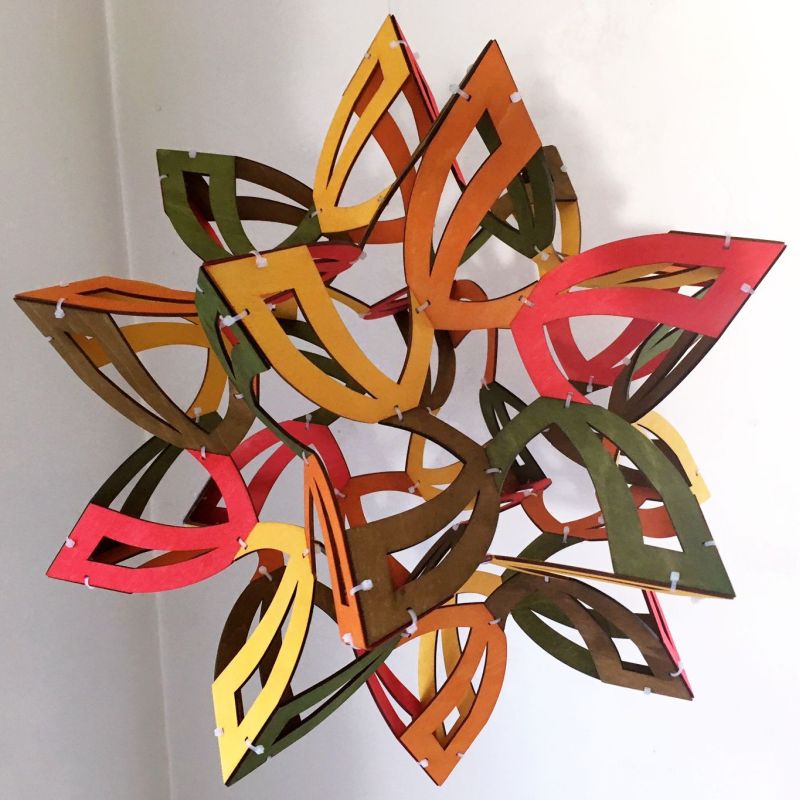
11. Take group photos and  hang it up on display.  This image shows a version stained all in one color.


12. And here's a version that is stained brown on the outside and yellow on the inside, assembled at a workshop at Eastern Carolina University.


Part C. Conclusion

1. Ask students to relate the structure to a Platonic solid.  They should notice there are twelve pentagonal openings and twenty 3-fold vertices, as in a dodecahedron.  There are also thirty curvy openings, corresponding to the edges of the dodecahedron, i.e., each lies between two vertices.

2. Discuss the rotational symmetry axes of the sculpture.  Students should be able to find the 3-fold axes (lines that connect opposite 3-fold vertices), the 5-fold axes (through the center of each pentagonal opening), and the 2-fold axes (in the curvy space between any two adjacent vertices).  Demonstrate the rotations on these axes which bring the sculpture back to its position.  Point out that the axes are arranged in the same way as a dodecahedron or icosahedron.  There are ten 3-fold axes, six 5-fold axes, and fifteen 2-fold axes. 

3. Discuss whether there is any mirror symmetry in the sculpture.  Students should see that (unlike a regular dodecahedron) there is no mirror symmetry, so the sculpture could have been made in a left-hand or right-hand form. It is chiral and has the same rotational symmetry but not the mirror symmetry of the dodecahedron.  Look at it in a mirror to see how the other handedness would appear; the spirals would go the other way.

4. Ask students to look for co-planar pieces---more than one part lying in the same plane.  They should observe that each piece has exactly one mate in its own plane, so the sixty parts lie in just thirty planes.  Positioning your eye to be in the plane of a piece and sighting along that plane makes it easy to see the co-planarity.  If students are familiar with the rhombic triacontahedron, you can explain that the thirty planes of the sculpture's pieces are the face planes of an imagined (invisible) rhombic triacontahedron in the center of the orb. 


Possible Extensions

A.  The Design-Your-Own-Sculpture activity explores the geometry of this sculpture in further depth.

B.  Try all four sculpture activities.

C.  After making the sculpture once to learn its geometric structure, you can build a lovely five-colored version as shown at the top of this page.  First notice how some pieces are co-planar, some are parallel, and some lie in perpendicular planes.  Pick any piece, then find a total of twelve pieces (including itself) such that all twelve are co-planar, parallel, or perpendicular to the others in the set.  These twelve can all be one color.  Pick another such set of twelve for the second color, etc.  Choose five colors and stain twelve pieces in each color and enjoy the puzzle of assembling them to satisfy the constraint that whenever two pieces are co-planar, parallel, or perpendicular, they are chosen to be the same color.  (This 5-coloring derives from the five-colored rhombic triacontahedron and will be easier to understand if you have done that activity previously.)

D.  Symmetry Search Game.  Choose any piece, put a red sticker on it, then choose any other piece and put a blue sticker on it in the corresponding place.  (The first time you do this, choose two pieces in the same pentagon, as it is easy to see which rotation on that 5-fold axis is needed.)  Challenge students to find a rotation that brings the first piece to the position of the second piece.  There is always exactly one rotation (i.e., symmetry transformation) of the entire sculpture which brings the red piece to the position of the blue piece (and leaves the entire sculpture looking unchanged).  You can have the students physically rotate the sculpture to check that the red sticker moves to where the blue one started. It might be 1/5 or 2/5 or 3/5 or 4/5 of a revolution on one of the six 5-fold axes, or 1/3 or 2/3 of a revolution on one of the ten 3-fold axes, or 1/2 a revolution on one of the 2-fold axes.  (Note that this adds up to 59 distinct possibilities; exactly one for each of the 59 pieces you could have put the blue sticker ion.)  ((If we also allow that the blue and red sticker may be placed on the same piece, then also allow for the "identity rotation" of 0 degrees, and there are exactly 60 possibilities.))  (After finding the rotation that moves red to blue, observe that the rotation moving blue to red is just the inverse rotation on the same axis, i.e., 360 degrees minus the original rotation angle.)  After finding the rotation that works, move either sticker to a different piece for a new challenge.  (((If you choose two co-planar pieces, the answer will be the 2-fold axis orthogonal to their common plane.)))


Note: The original sculpture of this design is called Frabjic.  We have adapted it for this Making Math Visible activity.  Thank you Cliff Hollis / ECU News for this photo and the group photo above.