Paper Square Ball
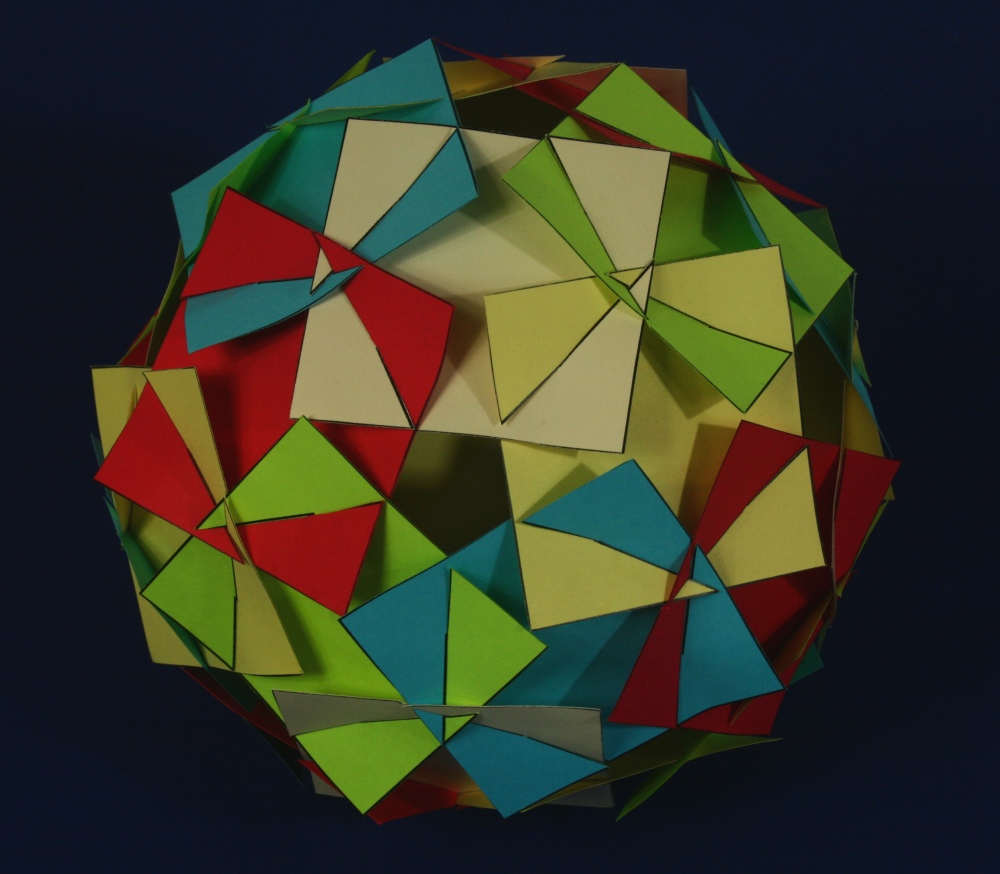
The Paper Square Ball is part of a family of "slide-together"
paper constructions that are made by cutting a number of identical
pieces of paper which fit together without tape or glue. In
this construction, thirty squares of five different colors are
assembled. This is a logic puzzle that touches on aspects of
mathematics involving both geometry and combinatorics (described
below). It is a great exercise in problem solving in which
students get to use spatial reasoning to discover and extend
geometric and coloring patterns. When complete, students
will have created a colorful orb which they can take home or use
to decorate the classroom. There is also a nice visual
surprise in which students will suddenly see the result in an
entirely different manner.
The Paper Square Ball is a wonderful activity for middle and high
school students to develop concrete and mental
visualization. Furthermore, it
works as a team-building project, encouraging collaboration and
mathematical communication. With middle school
students, we recommend the simpler Paper
Triangle Ball beforehand.
This a great example of modular kirigami (assembling cut pieces of
paper) and a perfect preparation before more complex paper
constructions. In general, explorations with paper can be
mathematically rich, inexpensive, and accessible ways for students
to start thinking three dimensionally.
Be warned that this activity is trickier than it looks! It
will be most successful if the teacher has mastered the steps
ahead of time so he or she can demonstrate it with ease. Before attempting this construction, students should
have built all five Platonic solids, to be familiar with their
symmetries.
This activity provides rich classroom material for teachers
following the Common Core
Standards for Mathematical Practice. This lesson also
provides cross-curricular connections to art, architecture, and
higher-level strands of mathematics.
Detailed
Instructions
Time
Required: 1 Hour
Materials
- Card Stock in five colors (one
sheet in each of the five colors per pair of students)
- Scissors
- Template (pdf file)
Notes
- Copy the template onto the card
stock ahead of time. Only card stock will work.
Ordinary copy paper is too thin. Card
stock is a heavy weight paper, stiffer than standard paper,
but thin enough to snake through the rollers of a copy
machine or laser printer. Most copy shops have a selection
of colors on hand that they can copy on to for you, or you
can buy it by the ream to put in your own copier.
- Each Paper Square Ball is made of
thirty squares. There are six squares on the template
sheet, so five sheets are required to make one orb.
- This workshop can optionally be
simplified by eliminating the color aspect and printing the
template onto one solid color of card stock.
- The activity works best when
students work in pairs or at most in groups of three. It
can be adapted for students to work individually, but would
require extra time.
- If you have access to a bulk
paper cutter (typically at a print shop), it can be used to
cut out all the squares at once using this template with
registration marks, sent to us by Kathy Lin of the Proof
School. This leaves just the diagonal slots to be cut with
scissors.
Steps
1. Hand out scissors and the printed card stock sheets.
Each group of students receives five sheets---one in each of the
five colors.
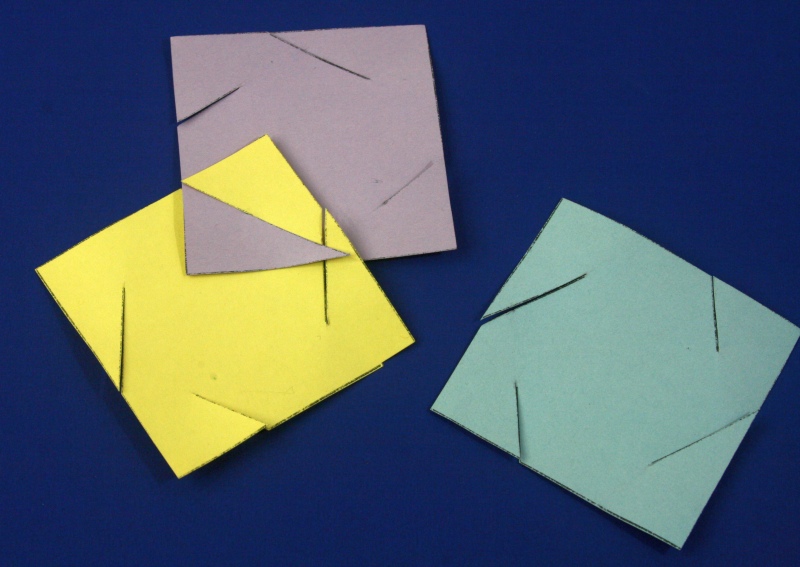
2. Tell students to cut out the thirty squares and
individually cut the four slots in each. Neatness counts! Warn students NOT to
stack the sheets or the squares, trying to save time and cut
through several sheets at once; that would be too inaccurate.
3. After most groups have cut out at least ten squares, tell
students that we will begin exploring the shape now and that
they can finish cutting later. Pose the following puzzle,
adding these hints gradually, giving students time at each
stage:
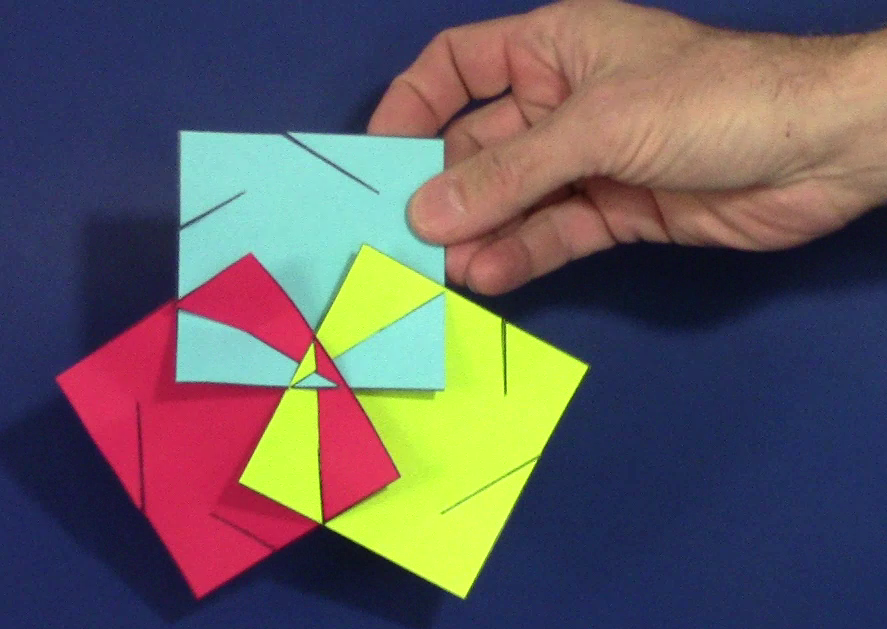
- Find a natural way for
three squares to join together. Use three different colors.
- Use the slots somehow. Make
sure they are slid together all the way.
- The result has 3-fold symmetry: A
goes to B, B goes to C, C goes to A.
- The pieces need to bend slightly
when they are being connected, but then are flat after they
are joined.
- A long slot and a short slot
always connect. (Never long to long. Never short to short.)
- When done correctly, the result
has the appearance of three squares passing through each
other.
- There will be a small three-color
triangle at the center of the joint.
Encourage students to
hold up and share their discoveries, giving more hints as
needed. Eventually a group will have the correct assembly
or you will show them the following 3-square assembly:
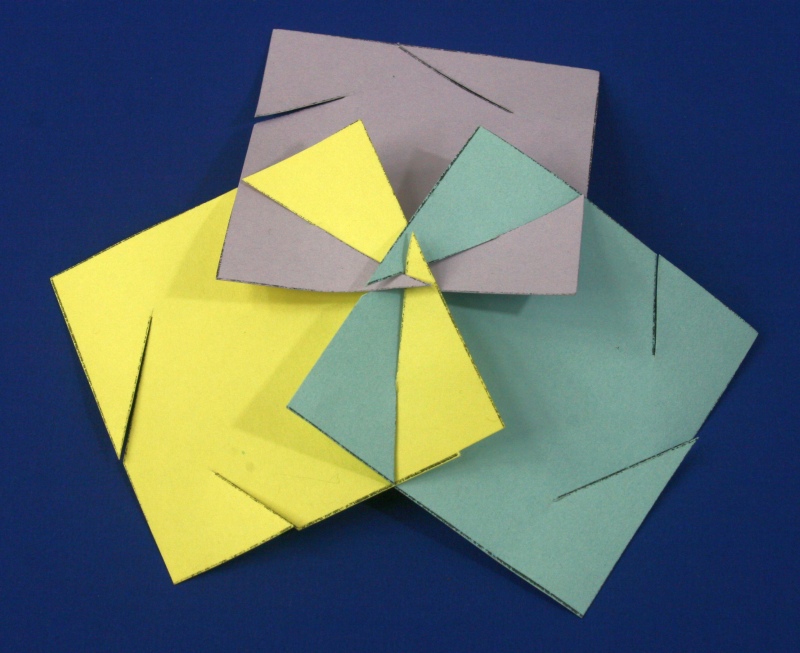
4. Hold up a 3-square
joint and give the following instructions so every group can
replicate it. First observe that the four slots in any
square alternate long-short-long-short around the
perimeter. The tip of the long slot has a more acute angle
than the tip of the short slot. The goal is to bring three
of those acute tips together to form a triangle (one from each
of the three squares). Join a long slot of one square to a
short slot of another square and you will see that two of the
acute tips are near each other.
Then with two more
connections, you can bring a tip of the third square to the same
area. Usually when the third square is connected, the
center of the unit has some of the tips bent or hidden
underneath other parts. With a small adjustment the three acute tips can be positioned to form a small
equilateral triangle in the center of the construction. This small equilateral triangle takes some practice to
find, but it is important because it is what locks everything
together.
This video may help clarify
the process:
Although it takes some time to understand this three-way joint,
this is the only type of connection needed anywhere in the
Ball. It is easier
to do than explain in text. Typically some students discover
it then demonstrate it to their peers.
5. Geometrically, the rest of the construction consists of
adding one square at a time to the growing structure, making
these three-way joints and and being careful to close a 5-way
cycle around a pentagonal opening whenever there is an
opportunity. The pictures above are a guide for the
teacher. In class it is more fun if the students do not
have a model to copy. Warn the students not to make
4-sided or 6-sided openings, only 5-sided openings. Warn
the students not to try to put together two halves, as the
separate color patterns will not be compatible. Instead
they need to keep adding one square at a time to one growing
structure. Students will discover that some of the edges
of the squares form 5-pointed stars (pentagrams) around the
pentagonal openings.
6. The color aspect needs to be carefully explained.
Before connecting a square, students need to think about what
color square can fit there, consistently with the following two
rules:
- Each square connects to
four other squares with its four slots. They must be
chosen to be the four other colors of the five. For
example, if a square is Red, it might have one neighbor each
of Blue, Yellow, Green, and Orange. It should not touch
another Red square. It should not touch two Yellow
squares.
- Each five-sided opening
should be surrounded by all five colors.
If students follow these two
coloring rules, they will be able to complete the Ball in a
consistent way.
7. Walk around the
room checking how the constructions progress, helping students
and pointing out any problems as early as possible. A common problem is not sliding the slots completely
into each other. Be sure always to
keep the corners of the squares on the outside of the
construction, so the boundary of each square is completely
visible. Double check as you go along that
every pentagonal opening is surrounded by five different colors
and each square joins with four other squares of the four other
colors. Keeping the squares flat (planar)
and having the corners meet crisply is the key to producing a
neat geometric impression.
8. When complete, ask students to examine their Paper Square
Ball more closely to see if it reveals any underlying structures
they haven't yet discovered. If they need a hint, tell
them to look at just any one color. They should see that
the six red squares are arranged as an exploded cube.
Similarly, the six squares of any other color are arranged as an
exploded cube. In fact, the structure can be understood as
a compound of five interwoven cubes.
9. You can conclude by showing this video
illustrating a family of related paper constructions that might
inspire students to explore further.
Conclusions and Extensions
10. Ask students to examine the color pattern on
each other's Paper Square Balls to determine whether all the
balls in the room are identical. Are there many different
color patterns? They should find that half the time they
can take any two balls and rotate one so it exactly matches the
other in all thirty squares. In fact, there are only two
possible legal colorings as explained below.
11. You can ask: How many “three-way corners” are there?
(Answer: 20, they correspond to the 20 faces of a regular
icosahedron. One way to count them is based on the fact that
each of 30 squares touch two three-way corners, and it takes
three such contacts to make each, so 30 × 2 / 3 gives 20.) How
many 5-sided openings are there? (Answer: 12, corresponding to
the 12 faces of a regular dodecahedron, calculated as 30 × 2 /
5.) How many 5-fold rotation axes are there? (Answer: 6. One
connects the centers of each pair of opposite 5-fold openings.)
12. You can discuss the combinatorics of the colors
meeting at the 3-way joints. Given five colors, ABCDE, how
many ways can you choose a subset of three? Answer: ten.
ABC, ABD, ABE, ACD, ACE, ADE, BCD, BCE, BDE, CDE. Students
can be led to observe that each of those ten combinations
happens exactly twice on their Ball. The two positions
will be exactly opposite and in reverse order, e.g., if one
corner shows ABC in clockwise order, then opposite it will be
ABC in counterclockwise order.
12. Similarly, you can discuss the combinatorics of the colors
surrounding the pentagonal openings at the high school or higher level. How many
different cycles of five colors are possible around a
five-sided opening? (Answer: 24, which is 5!/5 because there
are 5! permutations of the colors, then “equate” groups of
five that are cyclic rotations.) How many different cycles are
present in one model? (Answer: 12, one around each of the 12
openings.) So how many differently colored models are in the
classroom? (Ans: 2—If the order of initial cycle of five
colors is chosen randomly, roughly half the class will have
one coloring pattern and half will have the other.) What
determines which 12 of the 24 possible cyclic orders are found
in the same model? (Answer: The “even” permutations of the
five colors are in the same model. The odd permutations
appear on the other ball.)
Large-Scale
Constructions. After practice with these melon-sized
models, the idea can be applied at a larger scale. Large
cardboard versions about five feet in diameter can be made from
sheets of cardboard.
Related Constructions. For additional similar activities, there are six
other slide-togethers in this reference:
G. Hart, "Slide-Together
Geometric Paper Constructions," in Adventures on Paper,
Math-Art Activities for Experience-Centered Education
of Mathematics, Edited by Kristóf Fenyvesi, Ilona Oláhné
Téglási and Ibolya Prokajné Szilágyi, Publisher: Eszterházy
Károly College, Eger, 2014. (online
copy)
The triangles or
hexagons are simplest to build. The later ones, with
decagons, pentagons, decagrams, and pentagrams are increasingly
more difficult. One strategy is to have everyone in a class make
a single model and then have different teams each work on a
different one of the remaining models. Assign the more difficult
ones to the teams which want a greater challenge. Combining the
results can make a very attractive display.
References
Charles
Butler first described this design to us.
Portions
of this material appeared in the 2004 Bridges Conference booklet
of Teacher Workshop materials.