
Rhombic Triacontahedron Puzzle
II. Coloring and Combinatorics
Time Required: 80 Minutes
Materials
A good way to introduce students to combinatorics is to have them create Pascal's triangle. Pascal's triangle is a beautiful structure that contains many mathematical patterns and is easy to write out using just addition. Even elementary students can create it and understand some of its rich properties. Ask students to copy the following steps as you do them on the board:

1. Start with the number 1 at the top of the middle of the
board. Tell students to put their 1 at the top center of
their paper.
2. Make a second row with two 1's, slightly left and right of the top 1, creating a small equilateral triangle.
3. From now on, each row is one item longer, starting and ending with a 1, but the interior numbers will be determined by the following addition rule: to find an interior number, add the two numbers to its slight left and right in the row above it. So the middle number in the third row is 2, for example.
4. Start the fourth row with the 1's at each end and ask the class to help you find the two interior numbers. (They are both 3, i.e., 1+2 and 2+1.)
5. Ask students to write the next three or more rows on their own.
6. Tell students that the numbers in Pascal's triangle can help them solve difficult mathematical problems. Pose the following question:
7. Now ask the same question but choosing three club members out of a group of six. Students will find this is much more challenging and will see the need for some sort of a mathematical system. (The answer is twenty, but we don't expect students to find them all: ABC, ABD, ABE, ABF, ... DEF.) The need for a system becomes more obvious as the numbers get larger.
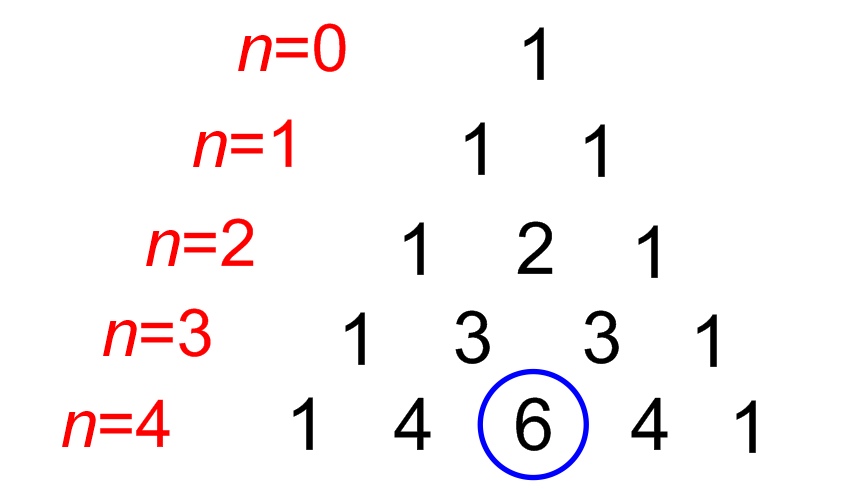
8. Tell students that Pascal's triangle gives the answer to all such questions. Given a set of size n, the question is how many ways are there to choose a set of size m. In the Eco-club question, we had n=4 and m=2. To find the answers, first number the rows of Pascal's triangle as shown above. Note that we start with row n=0 (not with n=1). Then we count to m, going across from left to right in that row, starting with m=0. For example the answer 6 is found as circled in the row where n=4 going across to the position where m=2.
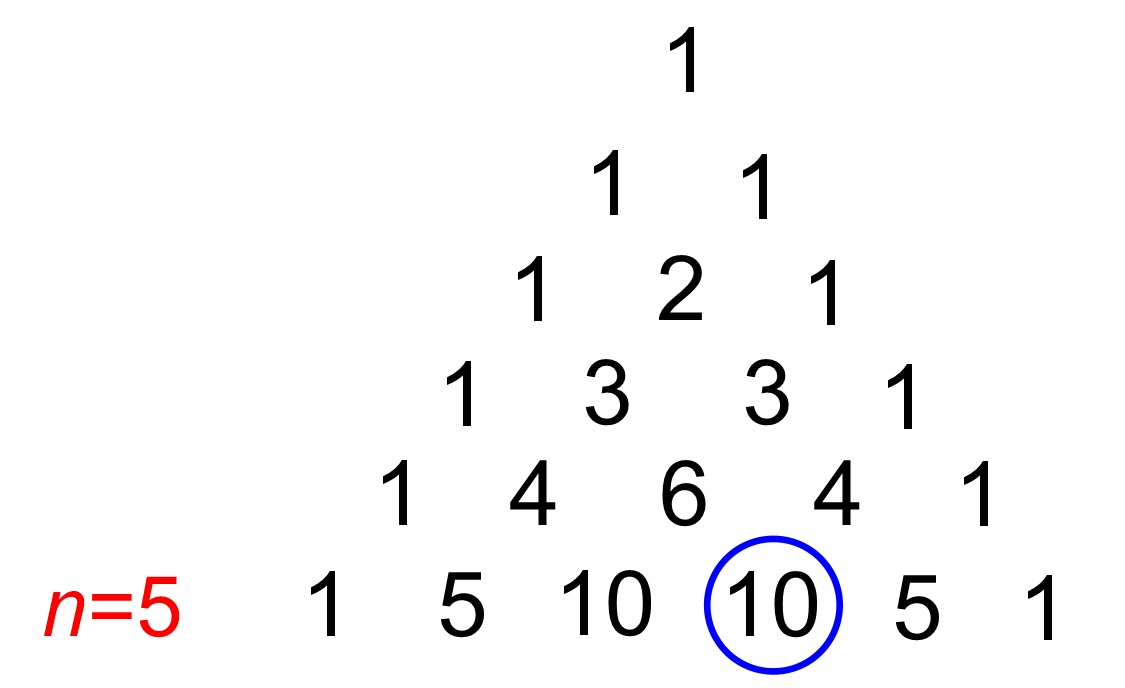
9. Give students a new problem in which n=5 and m=3 and ask them to find the answer two ways: by writing all the possibilities and by looking it up in the triangle. They should find the answer is 10 by writing out the ten possibilities: ABC, ABD, ABE, ACD, ACE, ADE, BCD, BCE, BDE, and CDE. They will also find the answer, 10, in Pascal's triangle, as circled above.
10. There is a way to explain why this always works. It is given in an exploration below if you want to explain it in class. Or you can tell students they will learn more about it in a probability or combinatorics class.
Part B. Hands-on assembly of colored paper blocks
1. Hand out scissors and the printed card stock sheets---two sheets in each color per group. Tell students they will make the same geometric forms as in Part I of this workshop, but adding a color aspect. They need an equal number of rhombi in each of the five colors.
2. For a quick mental math activity, you can ask them to calculate how many rhombi to cut out in each color, as the ten sheets have more rhombi than necessary. (There will be 24 of each color because there are 120 rhombi in total and 24=120/5. ) Ask students to save the extra rhombi (six in each color) as they will be used later on.
3. Ask students to make a number of piles, where each pile has three rhombi of three different colors and no two piles have the same combination of colors. They will discover that this corresponds to the problem above with n=5 and m=3, so all together they should have ten piles.
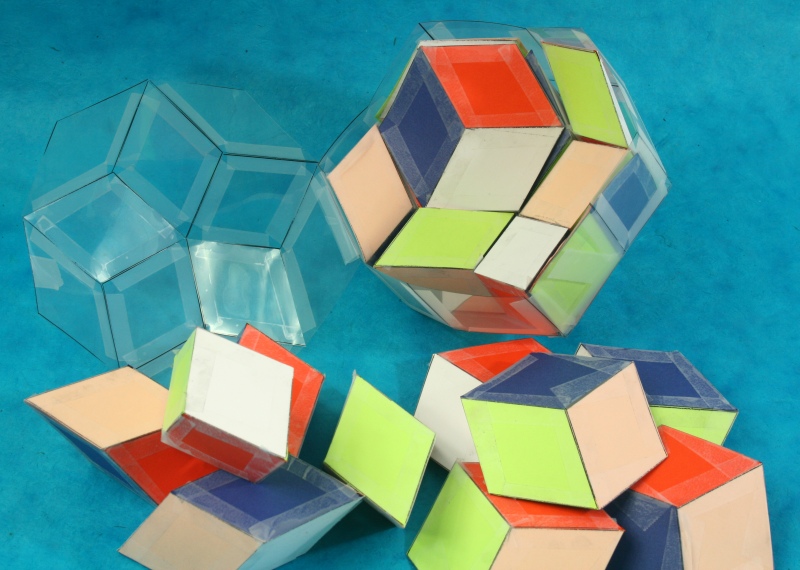
4. The goal now is to make one pointy block and one flat block for each of the ten color combinations. Each block has six faces but only three colors, so we will use two rhombi of each of the three colors to make one block. In addition, we never want two adjacent faces to have the same color, which implies that any two opposite faces will have the same color. In other words, there will be one pointy block with red opposite red, blue opposite blue, and yellow opposite yellow. There will also be one flat block with the same pattern. Similarly for each of the nine other ways of choosing three colors, making a total of twenty blocks.
5. Remind students that they will make ten of each rhombohedron shape and they will make two shapes for each color combination. Students should organize themselves so that they make all twenty blocks with no two repeated. One way to do this is to use the ten piles of three rhombi as a guide for creating twenty piles of six rhombi, making sure that ten are allocated to make pointy blocks and the other ten are for flat blocks.
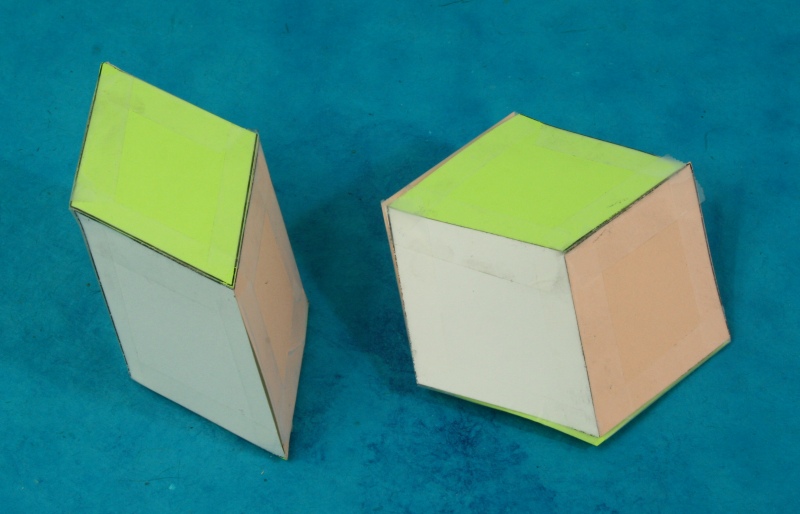
6. Ask students to tape the blocks together as they did in the solid-color model. Remind them to double-check that every block is different and that opposite faces are the same color.
7. Make a new shell as in Part C of the previous workshop. Hand out three sheets of the printed acetate per group. Ask students to cut out 30 rhombi and tape them together in the form of an RT. Let them design a case with a lid so the parts can easily be inserted and removed. Note that these rhombi are printed slightly larger to accommodate the paper blocks.

8. Once the case is finished, students can solve the puzzle of packing all twenty blocks into the RT shape. But now tell them there is a color rule to be followed. Whenever two rhombi touch face to face, those two faces must be the same color. This makes the puzzle much more challenging so encourage students not to give up.
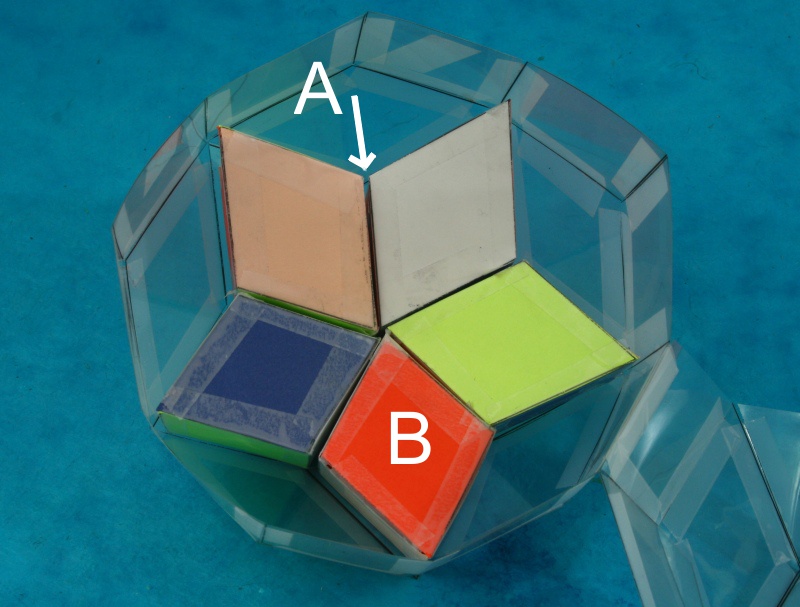
9. Students should
enjoy the struggle for a while, but may be able to proceed
only partway before getting stuck and needing to back up. You
can give them a hint. First point out the fact that opposite
faces in any block have the same color, which implies that any
two parallel faces anywhere in the solution will have the same
color. A way to solve it is to choose colors so that in
addition, whenever two faces are orthogonal (perpendicular),
they also are the same color. For example, if one starts
by assembling five pointy blocks to make a star as in the
figure above, then the two touching faces at arrow A should be
the same color (orange) as the visible face B, because they
can be seen to be orthogonal. Doing this systematically
in all five places will lead to a solution, but is tricky to
carry out. The following method will make it easier.
Part C. Coloring the Shell
1. In this exercise, students will attach the remaining colored rhombi (six in each of the five colors) to the clear shell in a special arrangement that leads to a solution of the color-matching puzzle. Hand out tape and ask students to gather their extra rhombi.
2. Ask students to lightly tape the "roof" on to their RT shell temporarily.
3. Challenge students to look at the RT shape and find parallel and perpendicular (orthogonal) faces. Finding parallel faces should be easy. Opposite faces are clearly parallel. Finding perpendicular faces is trickier, but can be more easily visualized by placing the RT shell with one face horizontal on the table, and turning it in such a way that four of the faces are parallel to the four walls of the classroom. (We assume you are in a rectangular room.) Now we have a set of six faces that correspond to the planes of an imagined cube. No matter which face is placed down on the table, a set of six such faces can be identified.
4. Ask students to choose one color and to tape the six rhombi of that color to the clear rhombi of their shell that correspond to the six faces of a cube. This should make it easier to visualize the planes of the cube.
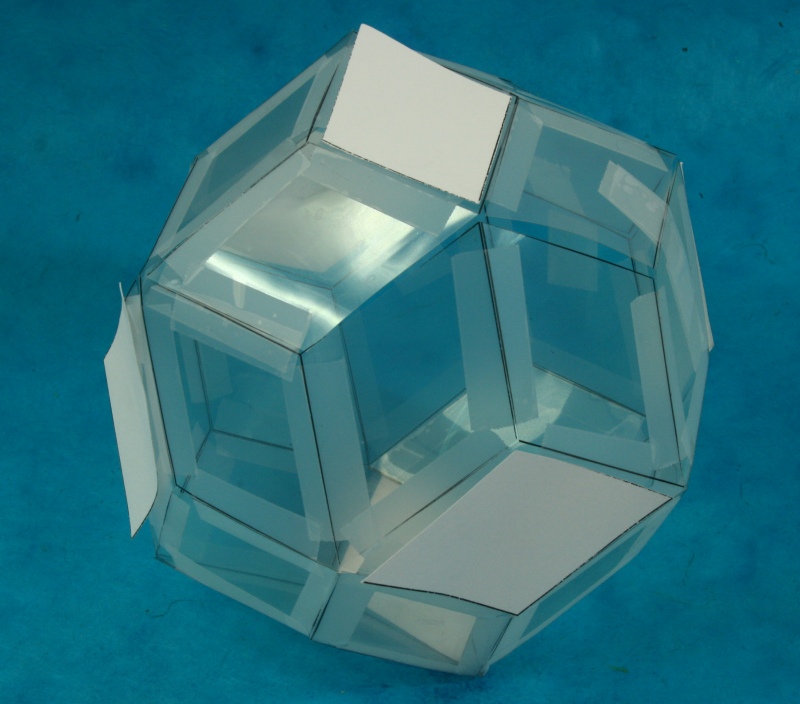
5. The next step is to turn the shell so a new uncolored face is flat on the table, rotate it again to visualize a new cube, and tape on the six rhombi of a second color.
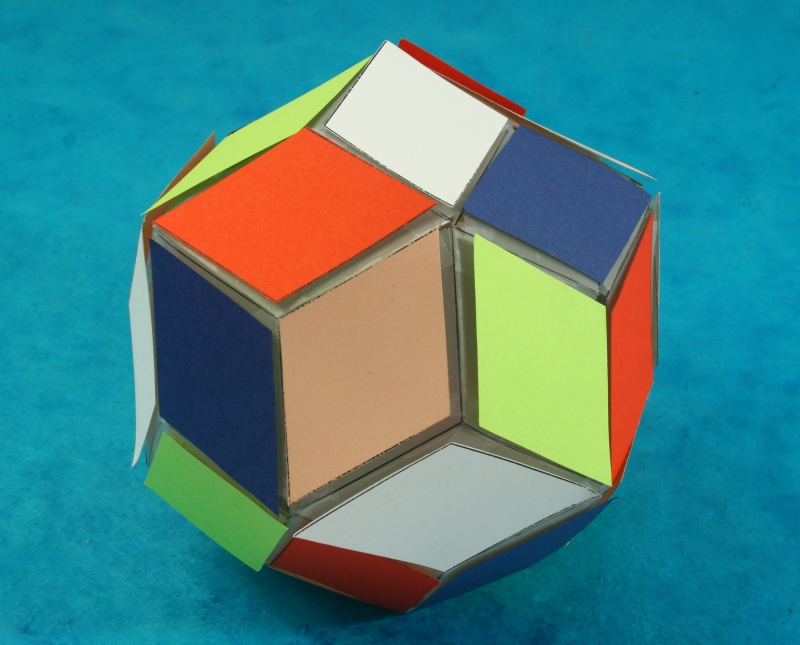
6. Repeat this procedure for the remaining three colors. All thirty faces will now have a colored rhombus. Each color will mark six faces arranged like the sides of a cube.
7. Ask students to partially un-tape the roof so it hinges open and shut. Remind them of the color-matching rule. Challenge them to solve the puzzle. They should now find this easy if they use the shell coloring as a guide and keep in mind that parallel faces are the same color.
8. Days later, after students have a deep understanding of how to solve the puzzle, they can take off the face covers (or use the previous uncolored shell) and be challenged to solve it without explicit guidance.
Possible Conclusions and Explorations
1. To consolidate the lesson, you can remind students that the RT shell has six directions of edges and each rhombohedral block has three directions of edges. It turns out that in the complete solution, each block corresponds to one of the ways of choosing three edge directions out of six. Looking it up in Pascal's triangle shows there are twenty possibilities. The twenty blocks in any solution are each oriented to correspond to one of the twenty ways of choosing three directions from the six possibilities.
2. It is interesting to observe that there are twenty 3-fold vertices on the exterior of the RT. In a color-matched solution, each of the ten ways of choosing three out of the five colors shows up at two of the 3-fold vertices. Two vertices with the same combination of three colors are always opposite. If the combination ABC appears in clockwise order on one 3-fold vertex, then ABC appears in counter-clockwise order on the opposite vertex.
3. Relate this activity and its exterior coloring to the 30-squares paper ball activity. Can you see how the angles of the slots in the square was determined?
4. One can understand why this coloring of the exterior (in which we choose parallel and perpendicular faces to be the same color) leads to a solution throughout the interior. We must never have an interior position requiring two adjacent faces of same color, because none of the blocks we created could fill it. By coloring orthogonal faces on the exterior the same color, we arranged that one color corresponds to the rhombi with edges AB or CD or EF and no set of just three edges can contain two of those three pairs.
5. One can understand why the entries in Pascal's triangle are the number of ways of choosing m elements from a set of size n. We'll use the notation C(n,m) to mean what is often called "n choose m," i.e., the number of ways of choosing m things from a set of n. (It is sometimes notated as an n over an m inside tall parentheses.) The left edge of the triangle is filled with 1's, which corresponds with the fact that C(n,0)=1, i.e., there is only one way to choose zero elements: the empty set. Similarly, the right edge of the triangle is filled with 1's, corresponding with the fact that C(n,n)=1, i.e., there is only one set that contains all n elements. The interesting question is why any interior element can be found by addition of the two nearby elements above it, i.e., why should C(n,m) = C(n-1,m-1) + C(n-1,m)? Let x be any specific element of a set, e.g., the first element. Then each subset either does or does not contain x, so the total number of subsets of size m can be obtained by adding the number of subsets that contain x to the number of subsets that do not contain x. In the first case there are m-1 choices remaining to make from the elements other than x, and in the second case there are still m choices to make from the elements other than x, so these numbers are precisely C(n-1,m-1) and C(n-1,m).
Materials
- Pencil and paper
- Card stock printed with template (paper-template.pdf) 2
sheets in each of five colors per puzzle
- Clear acetate sheets printed with template
(acetate-template.pdf)
3 sheets per puzzle
- Scissors
- Clear tape
- A few large paper clips
- Optional model of rhombic triacontahedron,
e.g., made of Zometool
1. It works best if the class is divided into groups of four to eight students. Each group works to make one puzzle.Part A. Minds-On
2. The paper clips are handy for accessing the interior of the blocks when applying tape. Other thin, rigid objects can work as well.
3. We find that lighter colors of paper look best, as the tape is less obvious, but the five colors must be clearly distinguishable.
4. One could adapt this activity by using five colors of highlighter markers to color the faces of the solid-color RT made in the previous workshop, however we find colored paper gives a more aesthetically pleasing result.
5. This is one of three related RT puzzle workshops.
A good way to introduce students to combinatorics is to have them create Pascal's triangle. Pascal's triangle is a beautiful structure that contains many mathematical patterns and is easy to write out using just addition. Even elementary students can create it and understand some of its rich properties. Ask students to copy the following steps as you do them on the board:

2. Make a second row with two 1's, slightly left and right of the top 1, creating a small equilateral triangle.
3. From now on, each row is one item longer, starting and ending with a 1, but the interior numbers will be determined by the following addition rule: to find an interior number, add the two numbers to its slight left and right in the row above it. So the middle number in the third row is 2, for example.
4. Start the fourth row with the 1's at each end and ask the class to help you find the two interior numbers. (They are both 3, i.e., 1+2 and 2+1.)
5. Ask students to write the next three or more rows on their own.
6. Tell students that the numbers in Pascal's triangle can help them solve difficult mathematical problems. Pose the following question:
Students should find the answer that there are six possibilities: if the student names are A, B, C, and D, the six possibilities are AB, AC, AD, BC, BD, and CD.There are are four students in the Eco-club. Two of them will be chosen to clean up the playground. How many ways are there to choose two students out of the four?
7. Now ask the same question but choosing three club members out of a group of six. Students will find this is much more challenging and will see the need for some sort of a mathematical system. (The answer is twenty, but we don't expect students to find them all: ABC, ABD, ABE, ABF, ... DEF.) The need for a system becomes more obvious as the numbers get larger.

8. Tell students that Pascal's triangle gives the answer to all such questions. Given a set of size n, the question is how many ways are there to choose a set of size m. In the Eco-club question, we had n=4 and m=2. To find the answers, first number the rows of Pascal's triangle as shown above. Note that we start with row n=0 (not with n=1). Then we count to m, going across from left to right in that row, starting with m=0. For example the answer 6 is found as circled in the row where n=4 going across to the position where m=2.

9. Give students a new problem in which n=5 and m=3 and ask them to find the answer two ways: by writing all the possibilities and by looking it up in the triangle. They should find the answer is 10 by writing out the ten possibilities: ABC, ABD, ABE, ACD, ACE, ADE, BCD, BCE, BDE, and CDE. They will also find the answer, 10, in Pascal's triangle, as circled above.
10. There is a way to explain why this always works. It is given in an exploration below if you want to explain it in class. Or you can tell students they will learn more about it in a probability or combinatorics class.
Part B. Hands-on assembly of colored paper blocks
1. Hand out scissors and the printed card stock sheets---two sheets in each color per group. Tell students they will make the same geometric forms as in Part I of this workshop, but adding a color aspect. They need an equal number of rhombi in each of the five colors.
2. For a quick mental math activity, you can ask them to calculate how many rhombi to cut out in each color, as the ten sheets have more rhombi than necessary. (There will be 24 of each color because there are 120 rhombi in total and 24=120/5. ) Ask students to save the extra rhombi (six in each color) as they will be used later on.
3. Ask students to make a number of piles, where each pile has three rhombi of three different colors and no two piles have the same combination of colors. They will discover that this corresponds to the problem above with n=5 and m=3, so all together they should have ten piles.
4. The goal now is to make one pointy block and one flat block for each of the ten color combinations. Each block has six faces but only three colors, so we will use two rhombi of each of the three colors to make one block. In addition, we never want two adjacent faces to have the same color, which implies that any two opposite faces will have the same color. In other words, there will be one pointy block with red opposite red, blue opposite blue, and yellow opposite yellow. There will also be one flat block with the same pattern. Similarly for each of the nine other ways of choosing three colors, making a total of twenty blocks.
5. Remind students that they will make ten of each rhombohedron shape and they will make two shapes for each color combination. Students should organize themselves so that they make all twenty blocks with no two repeated. One way to do this is to use the ten piles of three rhombi as a guide for creating twenty piles of six rhombi, making sure that ten are allocated to make pointy blocks and the other ten are for flat blocks.

6. Ask students to tape the blocks together as they did in the solid-color model. Remind them to double-check that every block is different and that opposite faces are the same color.
7. Make a new shell as in Part C of the previous workshop. Hand out three sheets of the printed acetate per group. Ask students to cut out 30 rhombi and tape them together in the form of an RT. Let them design a case with a lid so the parts can easily be inserted and removed. Note that these rhombi are printed slightly larger to accommodate the paper blocks.

8. Once the case is finished, students can solve the puzzle of packing all twenty blocks into the RT shape. But now tell them there is a color rule to be followed. Whenever two rhombi touch face to face, those two faces must be the same color. This makes the puzzle much more challenging so encourage students not to give up.

Part C. Coloring the Shell
1. In this exercise, students will attach the remaining colored rhombi (six in each of the five colors) to the clear shell in a special arrangement that leads to a solution of the color-matching puzzle. Hand out tape and ask students to gather their extra rhombi.
2. Ask students to lightly tape the "roof" on to their RT shell temporarily.
3. Challenge students to look at the RT shape and find parallel and perpendicular (orthogonal) faces. Finding parallel faces should be easy. Opposite faces are clearly parallel. Finding perpendicular faces is trickier, but can be more easily visualized by placing the RT shell with one face horizontal on the table, and turning it in such a way that four of the faces are parallel to the four walls of the classroom. (We assume you are in a rectangular room.) Now we have a set of six faces that correspond to the planes of an imagined cube. No matter which face is placed down on the table, a set of six such faces can be identified.
4. Ask students to choose one color and to tape the six rhombi of that color to the clear rhombi of their shell that correspond to the six faces of a cube. This should make it easier to visualize the planes of the cube.

5. The next step is to turn the shell so a new uncolored face is flat on the table, rotate it again to visualize a new cube, and tape on the six rhombi of a second color.

6. Repeat this procedure for the remaining three colors. All thirty faces will now have a colored rhombus. Each color will mark six faces arranged like the sides of a cube.
7. Ask students to partially un-tape the roof so it hinges open and shut. Remind them of the color-matching rule. Challenge them to solve the puzzle. They should now find this easy if they use the shell coloring as a guide and keep in mind that parallel faces are the same color.
8. Days later, after students have a deep understanding of how to solve the puzzle, they can take off the face covers (or use the previous uncolored shell) and be challenged to solve it without explicit guidance.
Possible Conclusions and Explorations
1. To consolidate the lesson, you can remind students that the RT shell has six directions of edges and each rhombohedral block has three directions of edges. It turns out that in the complete solution, each block corresponds to one of the ways of choosing three edge directions out of six. Looking it up in Pascal's triangle shows there are twenty possibilities. The twenty blocks in any solution are each oriented to correspond to one of the twenty ways of choosing three directions from the six possibilities.
2. It is interesting to observe that there are twenty 3-fold vertices on the exterior of the RT. In a color-matched solution, each of the ten ways of choosing three out of the five colors shows up at two of the 3-fold vertices. Two vertices with the same combination of three colors are always opposite. If the combination ABC appears in clockwise order on one 3-fold vertex, then ABC appears in counter-clockwise order on the opposite vertex.
3. Relate this activity and its exterior coloring to the 30-squares paper ball activity. Can you see how the angles of the slots in the square was determined?
4. One can understand why this coloring of the exterior (in which we choose parallel and perpendicular faces to be the same color) leads to a solution throughout the interior. We must never have an interior position requiring two adjacent faces of same color, because none of the blocks we created could fill it. By coloring orthogonal faces on the exterior the same color, we arranged that one color corresponds to the rhombi with edges AB or CD or EF and no set of just three edges can contain two of those three pairs.
5. One can understand why the entries in Pascal's triangle are the number of ways of choosing m elements from a set of size n. We'll use the notation C(n,m) to mean what is often called "n choose m," i.e., the number of ways of choosing m things from a set of n. (It is sometimes notated as an n over an m inside tall parentheses.) The left edge of the triangle is filled with 1's, which corresponds with the fact that C(n,0)=1, i.e., there is only one way to choose zero elements: the empty set. Similarly, the right edge of the triangle is filled with 1's, corresponding with the fact that C(n,n)=1, i.e., there is only one set that contains all n elements. The interesting question is why any interior element can be found by addition of the two nearby elements above it, i.e., why should C(n,m) = C(n-1,m-1) + C(n-1,m)? Let x be any specific element of a set, e.g., the first element. Then each subset either does or does not contain x, so the total number of subsets of size m can be obtained by adding the number of subsets that contain x to the number of subsets that do not contain x. In the first case there are m-1 choices remaining to make from the elements other than x, and in the second case there are still m choices to make from the elements other than x, so these numbers are precisely C(n-1,m-1) and C(n-1,m).